Hey guys I am back with another tutorial and this time it is an easy "Task List App using HTML, Javascript and Firebase". The reason I chose Firebase is that it is very easy to set up and it is free to use. Firebase provides us with so many inbuilt features like Cloud Firestore and even provides free app hosting. We will be using Bootstrap's latest version for CSS design.
In this part will be setting up the following:
- Setting up a new Firebase Project.
- Initializing a front end template using the Firebase CLI in our project folder.
- Using the front end code to interact with the Cloud Firestore
1. Setting up a new Firebase Project
Go to the Firebase homepage, and sign in with your google account and just follow the video below,
In the video, I have just,
- Created a new Firebase project.
- Used the production mode for DB rules. (We will discuss DB rules in the future. For now we will leave it at default.)
- Setup the Cloud Firestore and enable it. (This is where our data will be stored and accessed from)
- Added a new webapp in the project.
- Copied the config object. (You will need the config object to interact with the Cloud Firestore)
2. Using the Firebase CLI to create a project template
Now that we have our Cloud Firestore ready, let us initialize our frontend. Luckily Firebase has a way to set up everything in a jiffy. First just install Firebase-tools using
npm i -g firebase-toolsAnd then use,
firebase loginLogin using your google account and then run
firebase initfrom your project folder
From the CLI features, we will select the following,

In the project setup we will select the "Use an existing project" and select our project name that we had created before in the Firebase console.
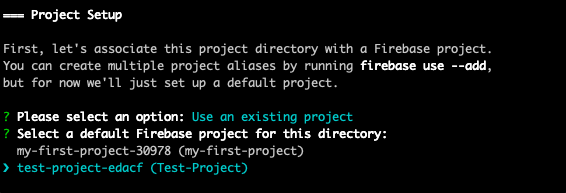
After that we will just go with the default files for firestore rules, indexes file by hitting "enter".

Choose Javascript in the cloud functions language prompt.
Press enter for the ESLint and install the dependencies,
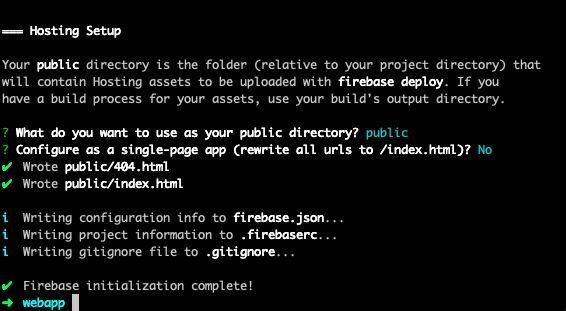
In the Hosting setup just hit "enter" until the project is done initializing.
Open the project folder in your preferred code editor and open the index.html file under the public folder. Remove the existing contents in the file and we will replace it with the below code.
<!doctype html><html lang="en"> <head> <meta charset="UTF-8" /> <meta name="viewport" content="width=device-width, initial-scale=1.0" /> <title>Firebase Form</title> </head> <body> <script src="https://www.gstatic.com/Firebasejs/7.22.0/Firebase-app.js"></script> <script src="https://www.gstatic.com/Firebasejs/7.22.0/Firebase-firestore.js"></script> </body></html>We need the Firebase-app script to initialise our Firebase app javascript and firestore script to connect to our Cloud Firestore using firestore methods.
3. Using front end code to interact with the Cloud Firestore
Now that we have our scripts ready, let us first initialise Firebase. Remember that config object that was shown in the project settings of Firebase? Now we need to copy that and we will initialise our Firebase and Firestore likewise.
<script> // variables const FirebaseConfig:{ apiKey: "AIzaSyC5gz7cr8wBZ9o2ecNUU_r1GYCqum7rm9E", authDomain: "test-project-edacf.Firebaseapp.com", databaseURL: "https://test-project-edacf.Firebaseio.com", projectId: "test-project-edacf", storageBucket: "test-project-edacf.appspot.com", messagingSenderId: "518981807023", appId: "1:518981807023:web:147419924a25c863625d5a", measurementId: "G-CPY1CX3641", }; Firebase.initializeApp(FirebaseConfig); const firestore:Firebase.firestore();</script>Now we have Firestore in action. We can now use Firestore methods to interact with our database. In the free plan of Firebase you are allowed only 1 database with unlimited number of records. I think one database is more than enough for most projects.
We will be doing all the operations "Create, Read, Update and Delete". First let's do a read operation. Firebase does not need the records to have a fixed structure. So you need to tell Firebase what key value you are adding. The only thing you need to remember in Firebase is that a Firebase collection can have multiple documents. Documents can contain data or a collection(also called sub-collection). Let me explain this with a simple example.
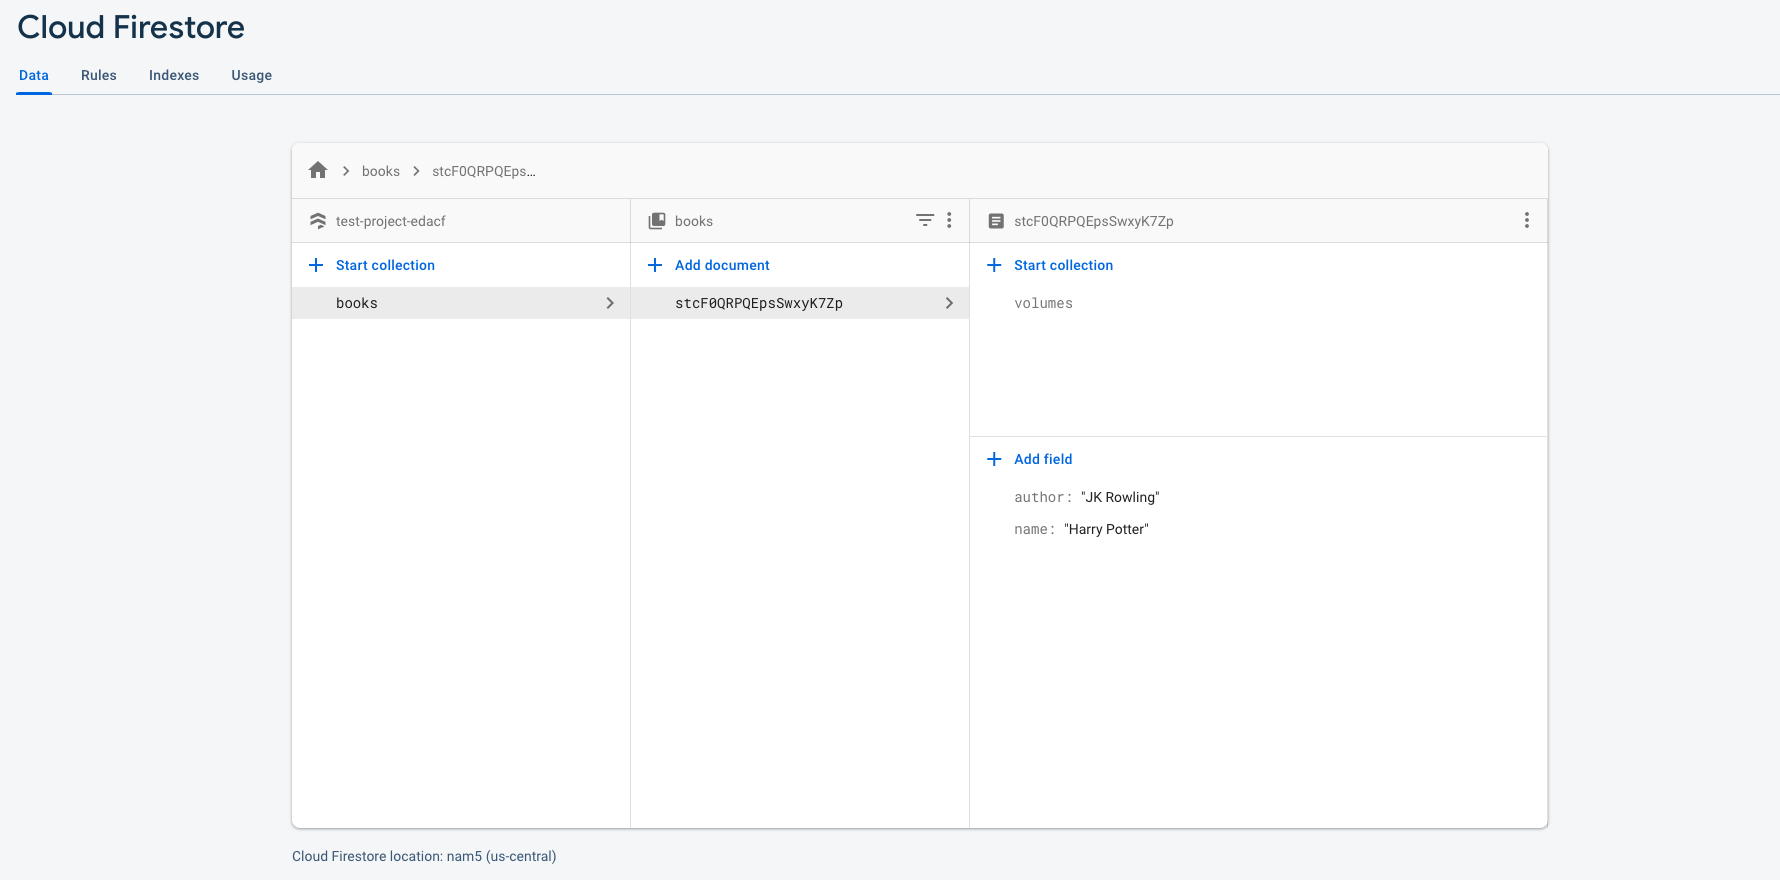
Here "books" is a collection. A collection can have a single or multiple number of documents. Each document has a unique id that can be automatically generated or can be set by the developer. I leave it at automatic for easy creation. Now you can see that the "books" collection has one document with a unique id stcF0QRPQEpsSwxyK7Zp. This id will be used to update or delete the document. Now this document has data such as name and author. I have only used "name" and "author" but you can give any number of data props.
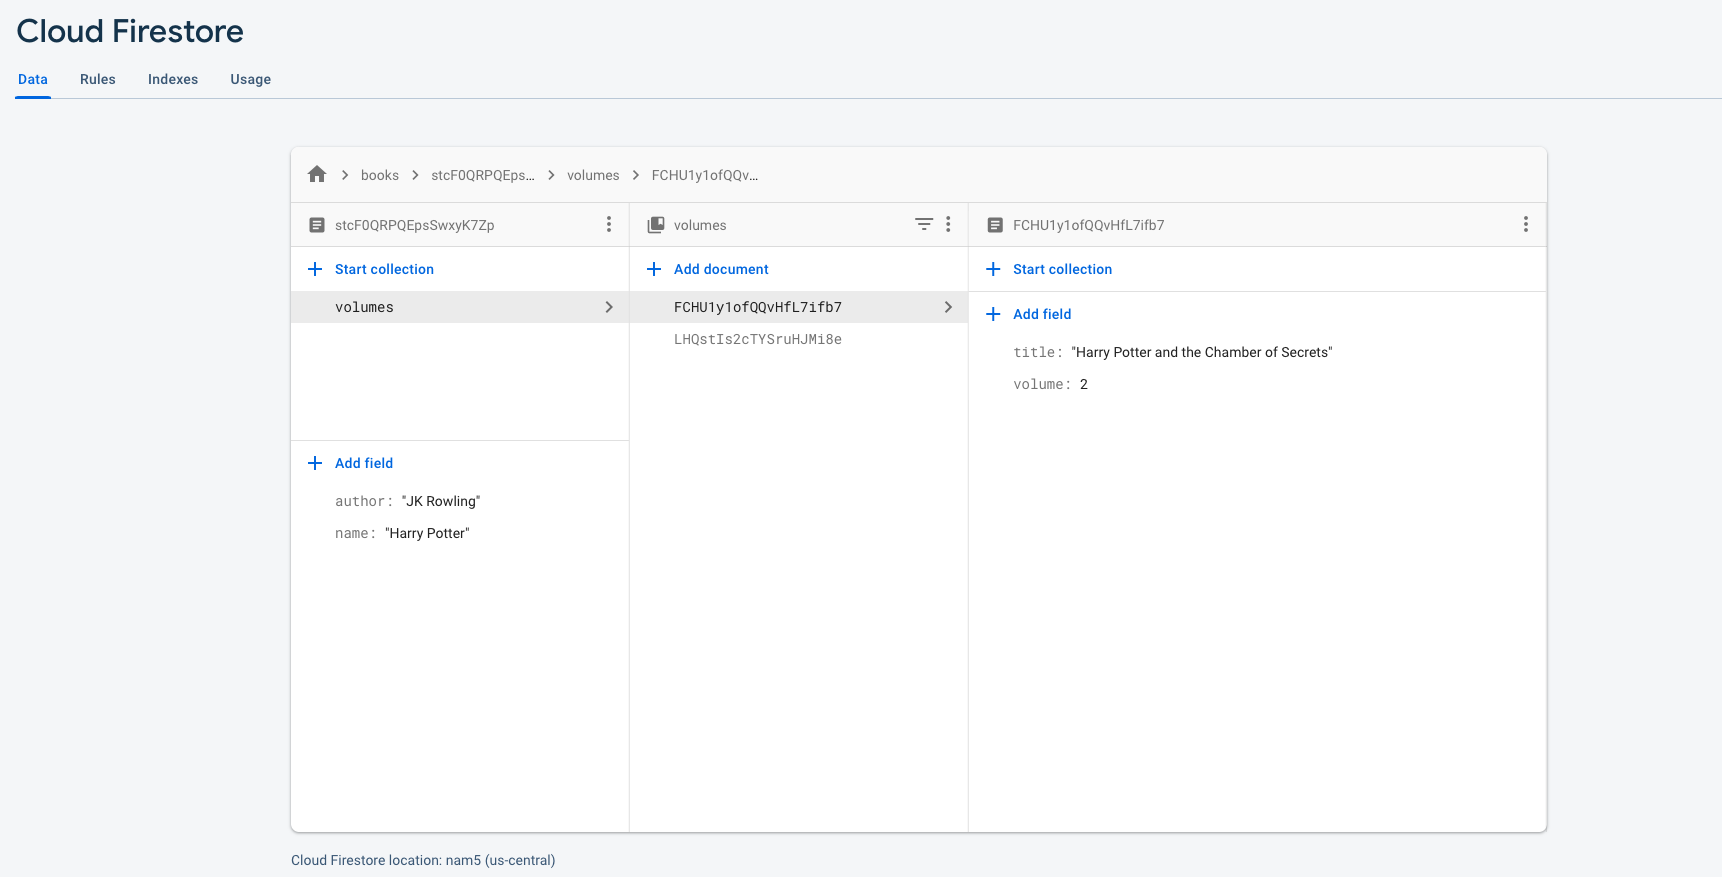
Now since a title has many volumes, we have created something called a sub-collection inside the "Harry Potter" book document. Now this sub-collection belongs to only the Harry Potter book and has the same structure as the previous collection. It contains documents with data or you can further sub-collections.
We will not talk about sub collections in this part. We will just create a collection named "tasks" and add multiple tasks in them, update a task or delete a task.
Let's start by listing them and showing them on the html page. First we need an element to render the list inside, (we will use the element with ID "tasks") so let's add this in the body.
<h1 class="p-2">My Tasks</h1><div id="tasks" class="row m-0 p-2"></div>Inside the script tag we will create a function to fetch the documents in the collection "tasks".
// variablesconst FirebaseConfig:{ apiKey: "AIzaSyC5gz7cr8wBZ9o2ecNUU_r1GYCqum7rm9E", authDomain: "test-project-edacf.Firebaseapp.com", databaseURL: "https://test-project-edacf.Firebaseio.com", projectId: "test-project-edacf", storageBucket: "test-project-edacf.appspot.com", messagingSenderId: "518981807023", appId: "1:518981807023:web:147419924a25c863625d5a", measurementId: "G-CPY1CX3641",};
Firebase.initializeApp(FirebaseConfig);const firestore:Firebase.firestore();const tasksDOM:document.getElementById("tasks");
// utility functionsfunction cleanData(snapshots) { let data:[]; snapshots.forEach(function (doc) { data.push({ id: doc.id, ...doc.data() }); }); return data;}
// Firebase functionsfunction fetchTasks() { return firestore .collection("tasks") .get() .then((snapshots) => cleanData(snapshots)) .then((tasks) => tasks.map((task) => createTask(task)));}
fetchTasks();Here you can see that we have called the collections method of firestore. The collections method takes the name of the collection and performs some actions on that collection. We need to fetch all the documents in the collection so we will use the collection method called get. The get method returns a Promise and this promise on resolve will give you something called a snapshot. It is just what it sounds like, it's a reference object used by Firebase to refer to documents. We will need to loop through the snapshots and clean the data to be displayed. The ID of the document will be in the id key of each snapshot and all the document data will be returned in a snapshot method called data().
We will be having two fields in the task document such as name and status. So I am just using this reusable function to display the tasks with check and delete icons. You can change it as per your needs.
// dom functionsfunction createTask(task) { const elem:document.createElement("div"); elem.setAttribute("id", task.id); elem.setAttribute("class", "card card-body p-2 col-4 row m-0 flex-row d-flex justify-content-between align-items-center"); let taskElem;
if (task.status === "incomplete") { taskElem:document.createElement("p"); taskElem.setAttribute("class", "m-0 col-7 p-0"); taskElem.innerText:task.name; } else { taskElem:document.createElement("s"); taskElem.setAttribute("class", "m-0 col-7 p-0"); taskElem.innerText:task.name; } elem.append(taskElem);
if (task.status === "incomplete") { const updateBtn:document.createElement("button"); updateBtn.setAttribute("class", "btn btn-success col-2 text-white mr-1"); updateBtn.innerHTML = '<svg xmlns="http://www.w3.org/2000/svg" width="20" height="20" viewBox="0 0 24 24" fill="none" stroke="currentColor" stroke-width="2" stroke-linecap="round" stroke-linejoin="round" class="feather feather-check"><polyline points="20 6 9 17 4 12"></polyline></svg>'; updateBtn.addEventListener("click", function () { return handleStatusUpdate(task); }); elem.append(updateBtn); }
const deleteBtn:document.createElement("button"); deleteBtn.setAttribute("class", "btn btn-danger col-2 text-white"); deleteBtn.innerHTML = '<svg xmlns="http://www.w3.org/2000/svg" width="20" height="20" viewBox="0 0 24 24" fill="none" stroke="currentColor" stroke-width="2" stroke-linecap="round" stroke-linejoin="round" class="feather feather-trash-2"><polyline points="3 6 5 6 21 6"></polyline><path d="M19 6v14a2 2 0 0 1-2 2H7a2 2 0 0 1-2-2V6m3 0V4a2 2 0 0 1 2-2h4a2 2 0 0 1 2 2v2"></path><line x1="10" y1="11" x2="10" y2="17"></line><line x1="14" y1="11" x2="14" y2="17"></line></svg>'; deleteBtn.addEventListener("click", function () { return handleDelete(task.id); }); elem.append(deleteBtn);
tasksDOM.append(elem);}Let us run the index page now. (I am just using the Live Server extension in VSCode. You can use anu server)
As Expected!!
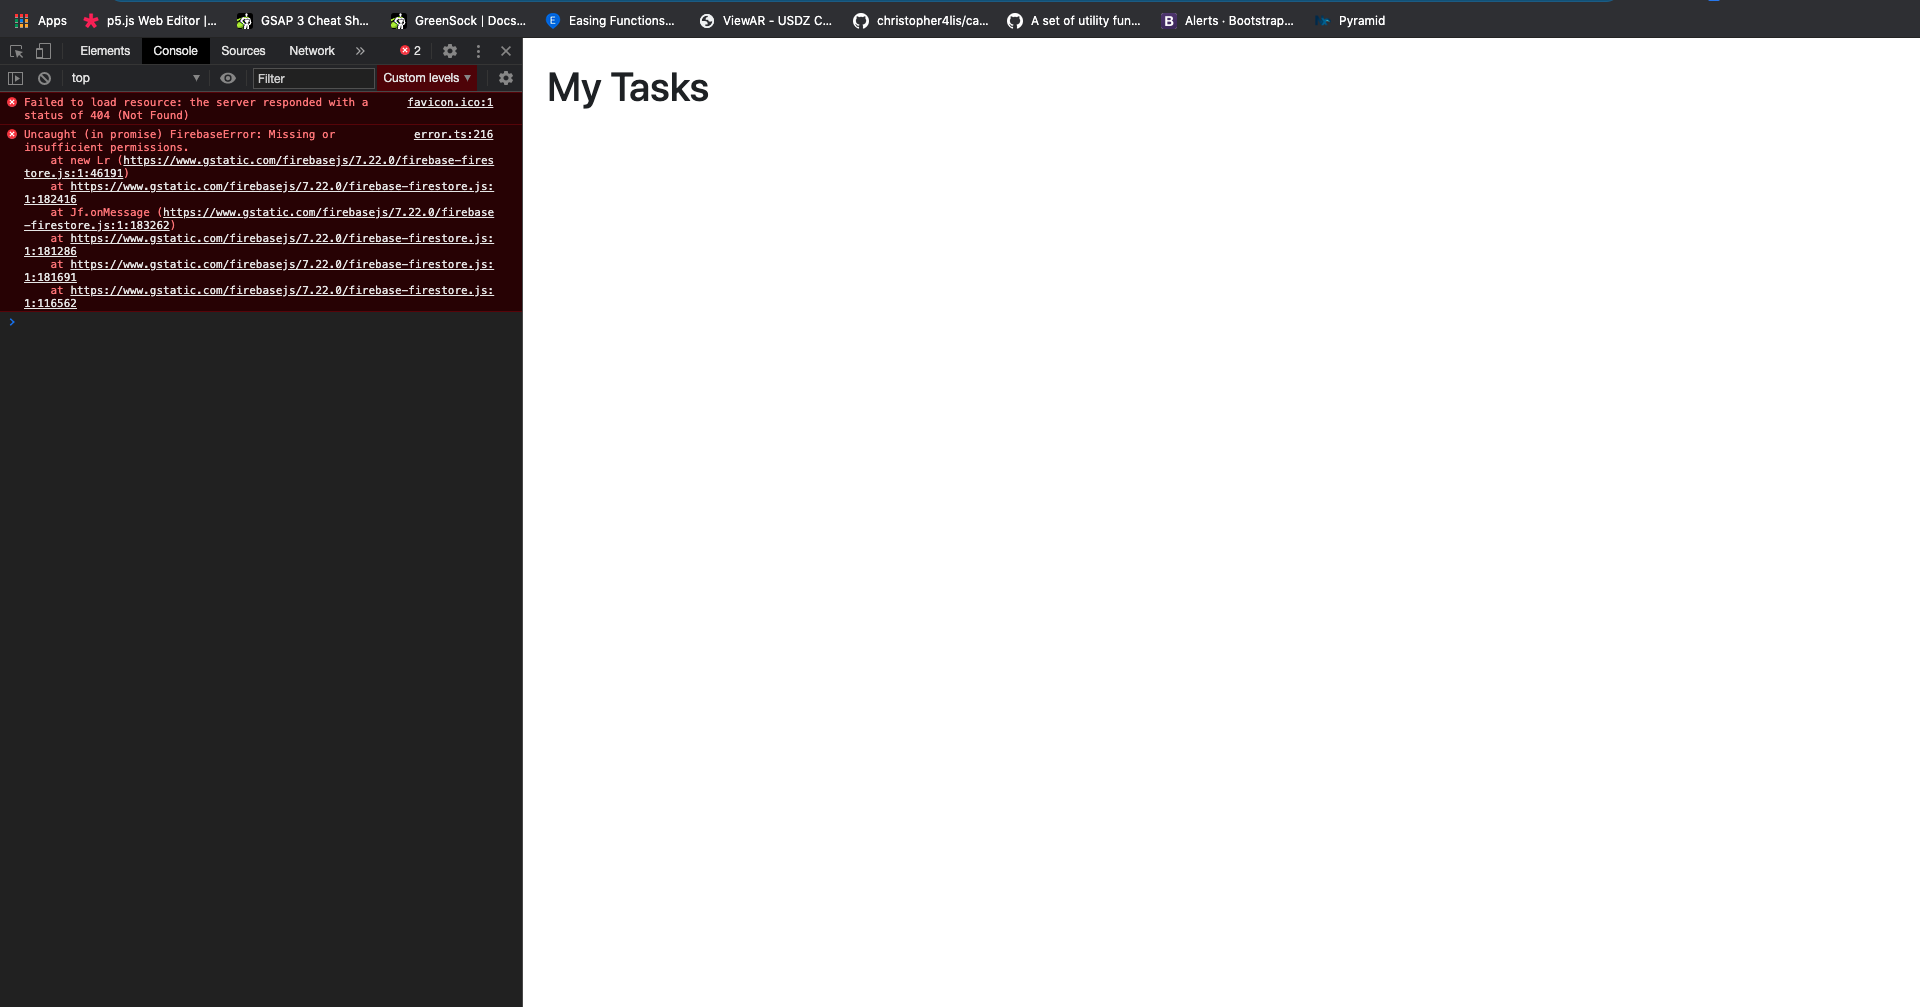
Nothing to worry about! In order for our index page to make read and write calls we need to allow it from the Firebase Rules. Just go to "Firebase -> Cloud Firestore" and under "Rules".
rules_version:'2';service cloud.firestore { match /databases/{database}/documents { match /{document=**} { allow read, write: if false (change this to true); } }}Now publish the new changes and we will try again. :) Now we won't get the missing permissions error but we won't have any data. Now let's add some data using forms.
<form onsubmit="return handleCreate(event)" class="d-flex align-items-center p-2"> <input class="form-control" id="taskTitle" aria-describedby="emailHelp" placeholder="Task Name" /> <button type="submit" class="btn btn-primary ml-3">Submit</button></form>And in our script tag our code should look something like this.
// variablesconst FirebaseConfig:{ apiKey: "AIzaSyC5gz7cr8wBZ9o2ecNUU_r1GYCqum7rm9E", authDomain: "test-project-edacf.Firebaseapp.com", databaseURL: "https://test-project-edacf.Firebaseio.com", projectId: "test-project-edacf", storageBucket: "test-project-edacf.appspot.com", messagingSenderId: "518981807023", appId: "1:518981807023:web:147419924a25c863625d5a", measurementId: "G-CPY1CX3641",};Firebase.initializeApp(FirebaseConfig);const firestore:Firebase.firestore();const tasksDOM:document.getElementById("tasks");const taskInputDOM:document.getElementById("taskTitle");
// utility functionsfunction cleanData(snapshots) { let data:[]; snapshots.forEach(function (doc) { data.push({ id: doc.id, ...doc.data() }); }); return data;}
// form functionsfunction handleCreate(event) { event.preventDefault(); let task:{ name: taskInputDOM.value, status: "incomplete", }; return firestore .collection("tasks") .add(task) .then((ref) => { task.id:ref.id; taskInputDOM.value: ""; return createTask(task); });}
function handleStatusUpdate(task) { //}
function handleDelete(id) { //}
// dom functionsfunction createTask(task) { const elem:document.createElement("div"); elem.setAttribute("id", task.id); elem.setAttribute("class", "card card-body p-2 col-4 row m-0 flex-row d-flex justify-content-between align-items-center"); let taskElem;
if (task.status === "incomplete") { taskElem:document.createElement("p"); taskElem.setAttribute("class", "m-0 col-7 p-0"); taskElem.innerText:task.name; } else { taskElem:document.createElement("s"); taskElem.setAttribute("class", "m-0 col-7 p-0"); taskElem.innerText:task.name; } elem.append(taskElem);
if (task.status === "incomplete") { const updateBtn:document.createElement("button"); updateBtn.setAttribute("class", "btn btn-success col-2 text-white mr-1"); updateBtn.innerHTML = '<svg xmlns="http://www.w3.org/2000/svg" width="20" height="20" viewBox="0 0 24 24" fill="none" stroke="currentColor" stroke-width="2" stroke-linecap="round" stroke-linejoin="round" class="feather feather-check"><polyline points="20 6 9 17 4 12"></polyline></svg>'; updateBtn.addEventListener("click", function () { return handleStatusUpdate(task); }); elem.append(updateBtn); }
const deleteBtn:document.createElement("button"); deleteBtn.setAttribute("class", "btn btn-danger col-2 text-white"); deleteBtn.innerHTML = '<svg xmlns="http://www.w3.org/2000/svg" width="20" height="20" viewBox="0 0 24 24" fill="none" stroke="currentColor" stroke-width="2" stroke-linecap="round" stroke-linejoin="round" class="feather feather-trash-2"><polyline points="3 6 5 6 21 6"></polyline><path d="M19 6v14a2 2 0 0 1-2 2H7a2 2 0 0 1-2-2V6m3 0V4a2 2 0 0 1 2-2h4a2 2 0 0 1 2 2v2"></path><line x1="10" y1="11" x2="10" y2="17"></line><line x1="14" y1="11" x2="14" y2="17"></line></svg>'; deleteBtn.addEventListener("click", function () { return handleDelete(task.id); }); elem.append(deleteBtn);
tasksDOM.append(elem);}
// Firebase functionsfunction fetchTasks() { return firestore .collection("tasks") .get() .then((snapshots) => cleanData(snapshots)) .then((tasks) => tasks.map((task) => createTask(task)));}
fetchTasks();The only new thing that we have added is the handleCreate function. This will get the input value from the form on submit and create a similar task object. Now to add a new document to the firestore, we will use the add method of firestore collection. The add method takes the data as argument and returns a promise which on resolving will give you a reference to the newly added Document. The reference will not contain the data, but it will have the id. You can choose to fetch it again or just add it from the task object that we created before. We will now just add the ref.id to the task object and call the create task to create a new task. Now we can see our create and list in action.
Now that we have completed the creation and listing part, let's start with the update and delete. Will will add the delete part first. Delete is very simple as we have the task elements with id. So when we delete a document of certain id from firestore, we can just remove the element of that document id from the DOM.
function handleDelete(id) { return firestore .collection('tasks') .doc(id) .delete() .then(() => document.getElementById(id).remove())}Here we are just using the delete method of doc to delete that document from firestore. We need to tell firestore that in the collection named tasks, there is a document with that id and call delete on that Firebase document. This will return a promise which on resolve we can just remove the element from the DOM.
Last but not least we will do the update method
function handleStatusUpdate(task) { let updatedTask: { name: task.name, status: 'complete' } return firestore .collection('tasks') .doc(task.id) .update(updatedTask) .then(() => { document.getElementById(task.id).remove() return createTask(updatedTask) })}So here we have removed the old task and added a new task, after updating. Similar to delete the collection method uses the doc id to identify the doc and update it by the argument passed in the update method. This method also returns a promise but does not give you the data when resolved. Let us see that in action.
Finally we will deploy our app using the command,
firebase deployThis command will automatically deploy the app using the Firebase hosting.
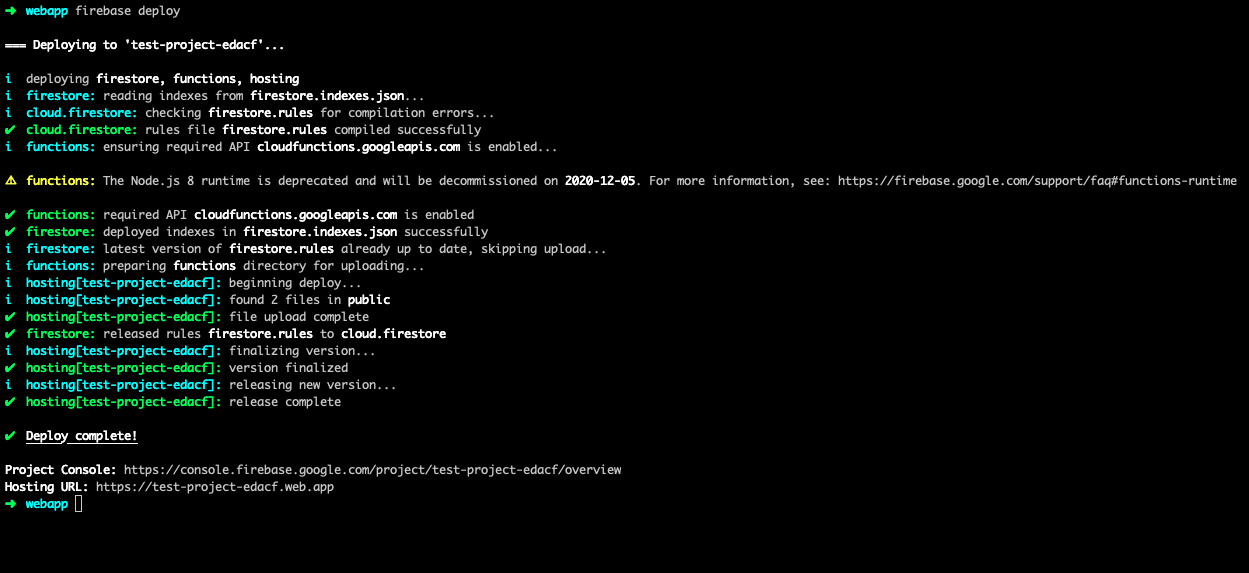
And here it is https://test-project-edacf.web.app/!
So here we have it. We have a simple task list made with HTML, JS and Firebase. In the upcoming parts we will discuss about,
- Displaying real time changes using the cloud firestore.
- Triggering firestore data changes using cloud functions.
- Use http methods to build REST api using firebase cloud functions.
- Validate http calls using Firebase tokens.
- Setting up firebase messaging to enable push notifications on the web.
- Building a complete Full Stack Application using a Front End framework and Firebase as Backend.
There's so much in stock and I can't wait to get to all of them! Stay tuned to read more about Firebase. 🎉
