Dark mode, nowadays, is one of the most demanding features the people are seeking in both mobile and web applications. It's a healthy option and the device emits less blue light while using Dark mode; I am damn sure all are obsessed with Dark Theme.
With the introduction of Android 10, Google brought the much-awaited Dark Mode to the native Android framework.
I didn't find any complete package of Dark Theme for Button Color, Text Color, and more importantly, the image changes while converting into Dark Theme on Web. That's why I decided to bring all together in one place and provide a complete walkthrough of Dark Theme implementation in Android Application.
Why do we need a Dark Theme?
It just looks great with few other advantages like,
- Can fundamentally reduce power utilization for devices with OLED display. That is the reason a few makers empower Dark Theme as a piece of the Battery Saver mode.
- Bring much more comfortable to use your device in a low-light environment.
- It is improving visibility for users with low or limited vision and those who are sensitive to bright light.
- The Dark mode is a huge help for battery life on android.
Adding the Dark theme to your Android Application
Now, we will be discussing how to add Dark Theme to Android Application. Let's start the implementation!!!
1. Declare Dependencies
Adding the following dependencies to your build.gradle(Module: app)
implementation 'com.google.android.material:material:1.3.0-alpha022. Adding a theme to our styles.xml
Let's replace the current android theme in our application with the "DayNight" theme.
styles.xml
<!-- Base application theme. --><resources>
<!-- Base application theme. --> <style name="AppTheme" parent="Theme.AppCompat.DayNight"> <!-- Customize your theme here. --> <item name="colorPrimary">@color/colorPrimary</item> <item name="colorPrimaryDark">@color/colorPrimaryDark</item> <item name="colorAccent">@color/colorAccent</item> </style>
</resources>Note: If you want to replace the color in the app, you need to create a custom values directory, called values-night, and for image resources as well we will create drawable-night.
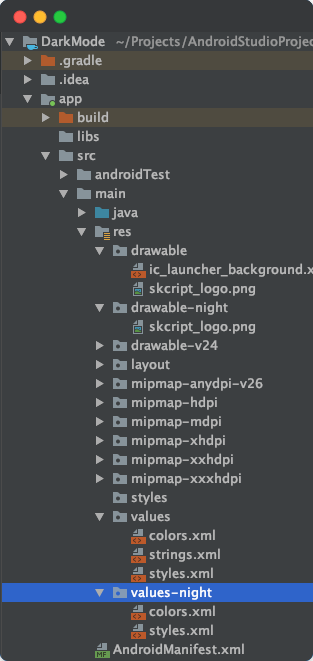
3. Creating Directories and xml files
Before adding the custom theme values to our application, we have to create new directories and xml files to implement Dark mode.
- Create values-night directory
To do this, right-click on the res/values folder and select "New -> Directory". The directory name should be "values-night".
- Create styles.xml (night)
After creating the "values-night" directory, we have to create styles.xml for night mode to declare the Dark Theme style.
Change your project structure to "Project" mode and right-click on the values-night folder and select "New -> Values Resource File". The name of the values xml file should be "styles.xml".
- Create colors.xml (night)
In advance, create the "colors.xml" values file for colors night mode. Follow the previous step to create the "colors.xml" file. The below image shows the structure of the "values" folder.
- Create drawable-night directory
Right-click on the "res" folder and select "New -> Directory". The directory name should be like "drawable-night".
Now, we created all the pre-required directories and xml to implement the Dark Theme.
Android Project Structure For Dark Mode

4. Sample Code For Android Dark Theme
- I write a simple code for the activity_main.xml class.
<?xml version="1.0" encoding="utf-8"?><RelativeLayout xmlns:android="http://schemas.android.com/apk/res/android" xmlns:app="http://schemas.android.com/apk/res-auto" xmlns:tools="http://schemas.android.com/tools" android:layout_width="match_parent" android:layout_height="match_parent" tools:context=".MainActivity">
<TextView android:id="@+id/WelcomeText" android:layout_width="wrap_content" android:layout_height="wrap_content" android:layout_alignParentTop="true" android:layout_centerHorizontal="true" android:layout_margin="@android:dimen/app_icon_size" android:text="Welcome to the DarkMode" android:textColor="@color/daynight_textcolor" android:textSize="18sp" />
<Button android:id="@+id/button" android:layout_width="wrap_content" android:layout_height="wrap_content" android:layout_below="@+id/WelcomeText" android:layout_centerHorizontal="true" android:text="Click Me" android:textAllCaps="false" android:textColor="@color/daynight_textcolor" />
<ImageView android:id="@+id/imageView" android:layout_width="250dp" android:layout_height="250dp" android:layout_centerInParent="true" android:src="@drawable/skcript_logo" />
<Switch android:id="@+id/switchCompat" android:layout_width="wrap_content" android:layout_height="wrap_content" android:layout_alignParentBottom="true" android:layout_marginBottom="@android:dimen/app_icon_size" android:layout_alignParentRight="true" android:checked="false" android:textAppearance="?android:attr/textAppearanceMedium" android:layout_marginRight="80dp" /></RelativeLayout>- We have to set a custom text color and drawable on the ImageView.
- The drawable filename, colors, style names need to be equal in both the directories for the assets you desire to toggle in DayNight theme.
- Text Color and Drawable Image will change depending on the device theme. Next, we move to set up the styles for both the Day-Night themes.
- The code for styles.xml for values and values-night folders are given below.
styles.xml
<resources>
<!-- Base application theme. --> <style name="AppTheme" parent="Theme.AppCompat.DayNight"> <!-- Customize your theme here. --> <item name="colorPrimary">@color/colorPrimary</item> <item name="colorPrimaryDark">@color/colorPrimaryDark</item> <item name="colorAccent">@color/colorAccent</item> <item name="android:textColorPrimary">@android:color/white</item> </style>
<style name="MyDialog" parent="Theme.AppCompat.Light.Dialog.Alert"/>
<style name="MySwitch"> <item name="colorControlActivated">@color/switchColor</item> </style></resources>styles.xml(night)
<resources> <!-- Base application theme. values-night.xml --> <style name="AppTheme" parent="Theme.AppCompat.DayNight"> <!-- Customize your theme here. --> <item name="colorPrimary">@color/orange</item> <item name="colorPrimaryDark">@color/orangeDark</item> <item name="colorAccent">@color/colorAccent</item> <item name="android:textColorPrimary">@android:color/black</item> </style>
<style name="MyDialog" parent="Theme.AppCompat.DayNight.Dialog.Alert"/>
<style name="MySwitch"> <item name="colorControlActivated">@color/switchColor</item> </style></resources>- The same for colors.xml for values and values-night folders are given below.
colors.xml
<resources> <color name="colorPrimary">#3F51B5</color> <color name="colorPrimaryDark">#303F9F</color> <color name="colorAccent">#FF4081</color> <color name="daynight_textcolor">#0044cc</color> <color name="switchColor">#911DEE</color></resources>colors.xml(night)
<resources xmlns:tools="http://schemas.android.com/tools"> <color name="colorPrimary">#3F51B5</color> <color name="colorPrimaryDark">#303F9F</color> <color name="colorAccent">#F77000</color> <color name="orange" tools:ignore="MissingDefaultResource">#FF8200</color> <color name="orangeDark" tools:ignore="MissingDefaultResource">#F77000</color> <color name="daynight_textcolor">#FF8222</color> <color name="switchColor">#F77000</color></resources>- The code for the MainActivity.java class
package com.example.darkmode;
import androidx.appcompat.app.AppCompatActivity;import androidx.appcompat.app.AppCompatDelegate;
import android.app.AlertDialog;import android.content.SharedPreferences;import android.os.Bundle;import android.view.ContextThemeWrapper;import android.view.View;import android.widget.Button;import android.widget.Switch;
public class MainActivity extends AppCompatActivity { Switch switchCompat;
@Override protected void onCreate(Bundle savedInstanceState) { super.onCreate(savedInstanceState); setContentView(R.layout.activity_main);
SharedPreferences sharedPreferences:getSharedPreferences("sharedPrefs", MODE_PRIVATE); final SharedPreferences.Editor editor:sharedPreferences.edit(); final boolean isDarkModeOn:sharedPreferences.getBoolean("isDarkModeOn", false);
switchCompat:findViewById(R.id.switchCompat); Button button:findViewById(R.id.button); button.setOnClickListener(new View.OnClickListener() { @Override public void onClick(View v) { ContextThemeWrapper ctw:new ContextThemeWrapper(MainActivity.this, R.style.MyDialog); new AlertDialog.Builder(ctw) .setTitle("Hi World!") .setMessage("Welcome to DarkMode") .show(); } });
if (isDarkModeOn) { AppCompatDelegate.setDefaultNightMode(AppCompatDelegate.MODE_NIGHT_YES); switchCompat.setText("Disable Dark Mode"); } else { AppCompatDelegate.setDefaultNightMode(AppCompatDelegate.MODE_NIGHT_NO); switchCompat.setText("Enable Dark Mode"); }
if (AppCompatDelegate.getDefaultNightMode() == AppCompatDelegate.MODE_NIGHT_YES) switchCompat.setChecked(true);
switchCompat.setOnClickListener(new View.OnClickListener() { @Override public void onClick(View v) { if (isDarkModeOn) { AppCompatDelegate.setDefaultNightMode(AppCompatDelegate.MODE_NIGHT_NO); editor.putBoolean("isDarkModeOn", false); editor.apply(); switchCompat.setText("Enable Dark Mode"); } else { AppCompatDelegate.setDefaultNightMode(AppCompatDelegate.MODE_NIGHT_YES); editor.putBoolean("isDarkModeOn", true); editor.apply(); switchCompat.setText("Disable Dark Mode"); } } });
}}Note: Don't forget to add the below code when you are using an alert dialog box.
ContextThemeWrapper ctw:new ContextThemeWrapper(MainActivity.this, R.style.MyDialog);ContextThemeWrapper helps you to change the dialog box color depending on your Day-Night theme.
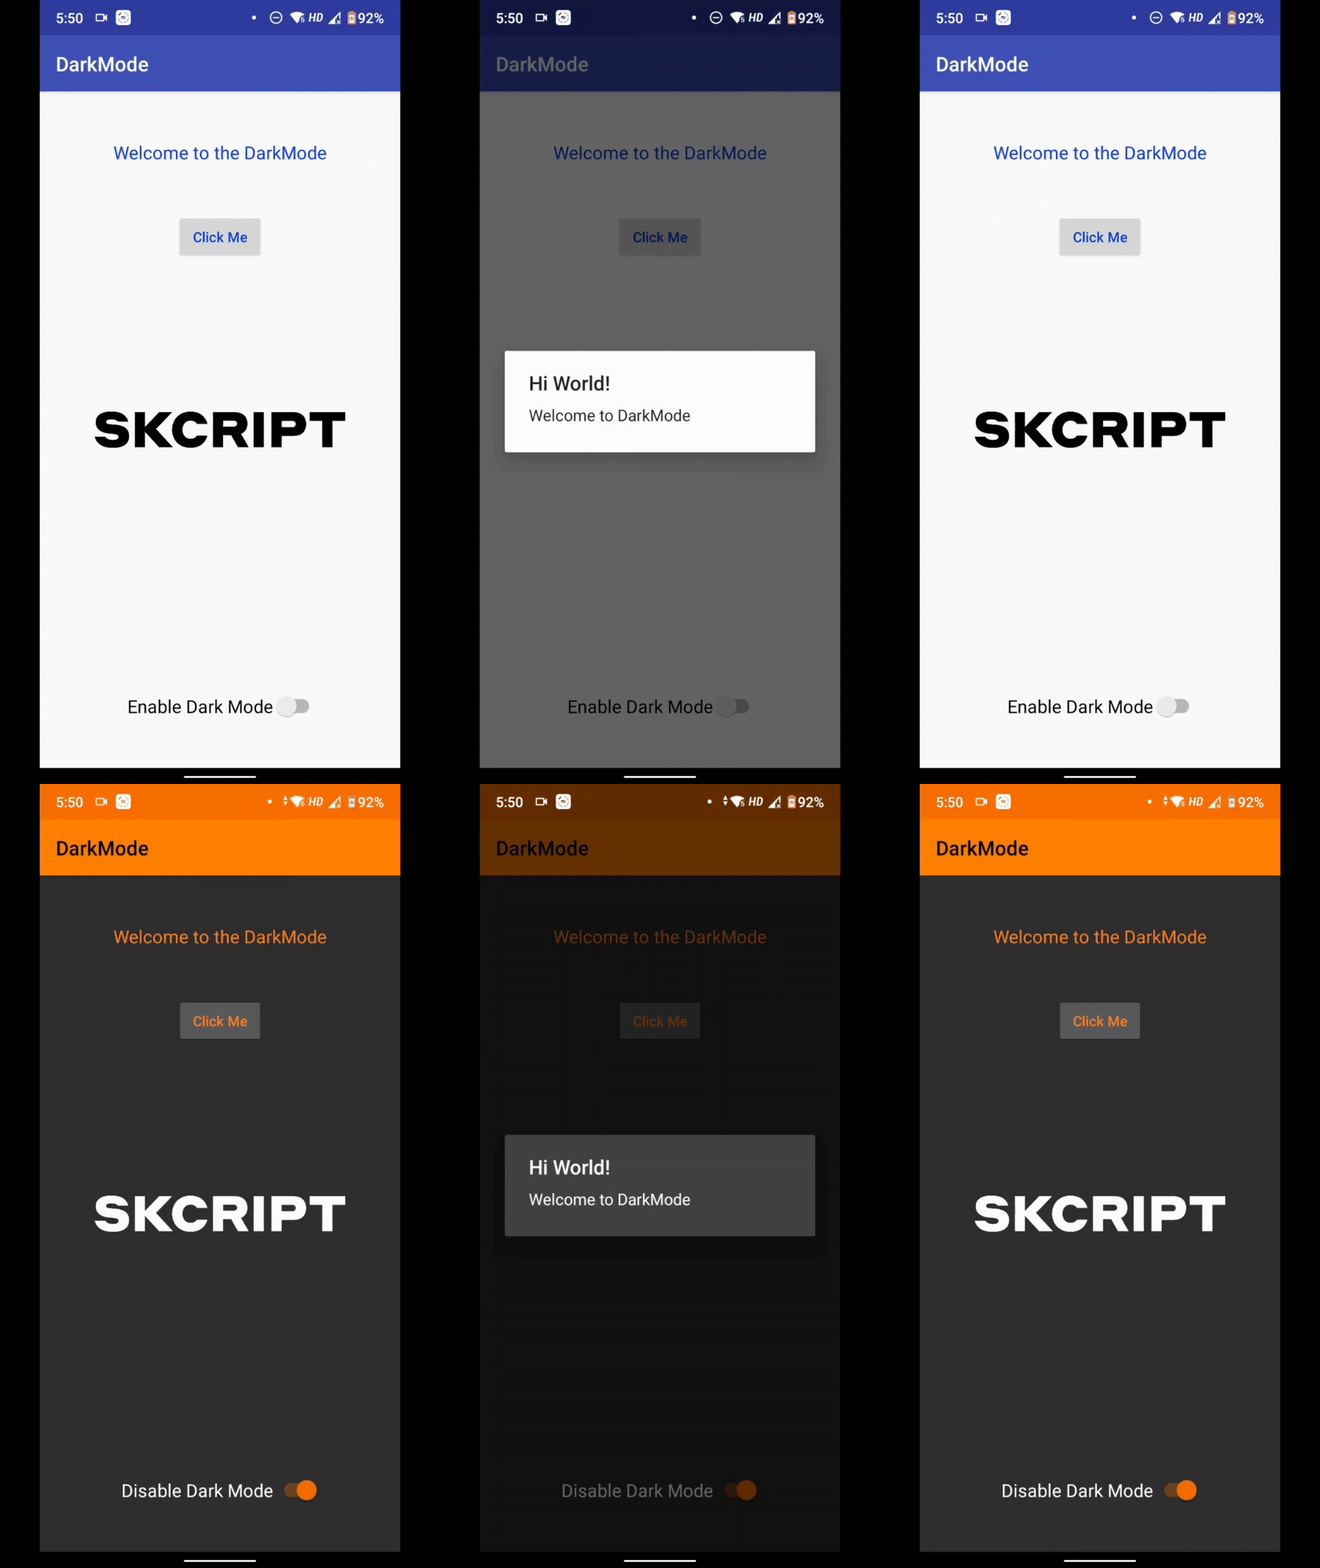
In the above code, we use the Switch to toggle between the day and night mode themes in our application. We save the current mode in a SharedPreference object. Use of Shared Preference, we retrieve the theme mode every time we open an application.
Android Dark Mode Output

