
In Android, Recyclerview is an advanced, flexible and upgraded version of Listview and Gridview. It is fast becoming one of the most used components in android applications. It uses less memory for listing large amount of datasets and collections. Furthermore, it provides the user a better experience.
I was looking for a finished model to add a header item to the recyclerview, yet, I couldn't discover something that was concise and clear. In this blog, we will try to develop a model that can be used for adding a header item to recyclerview for android applications.
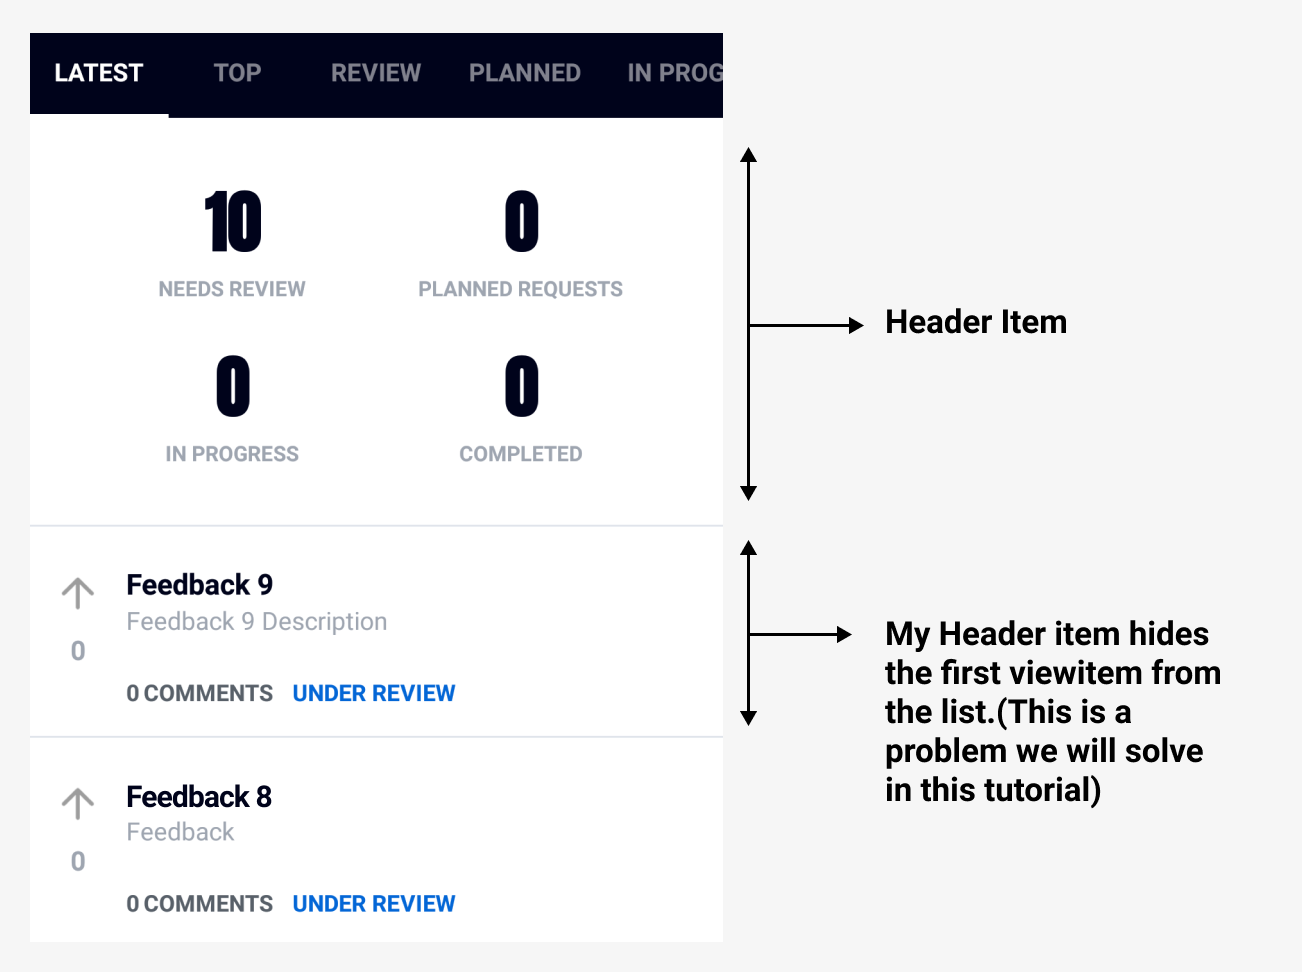
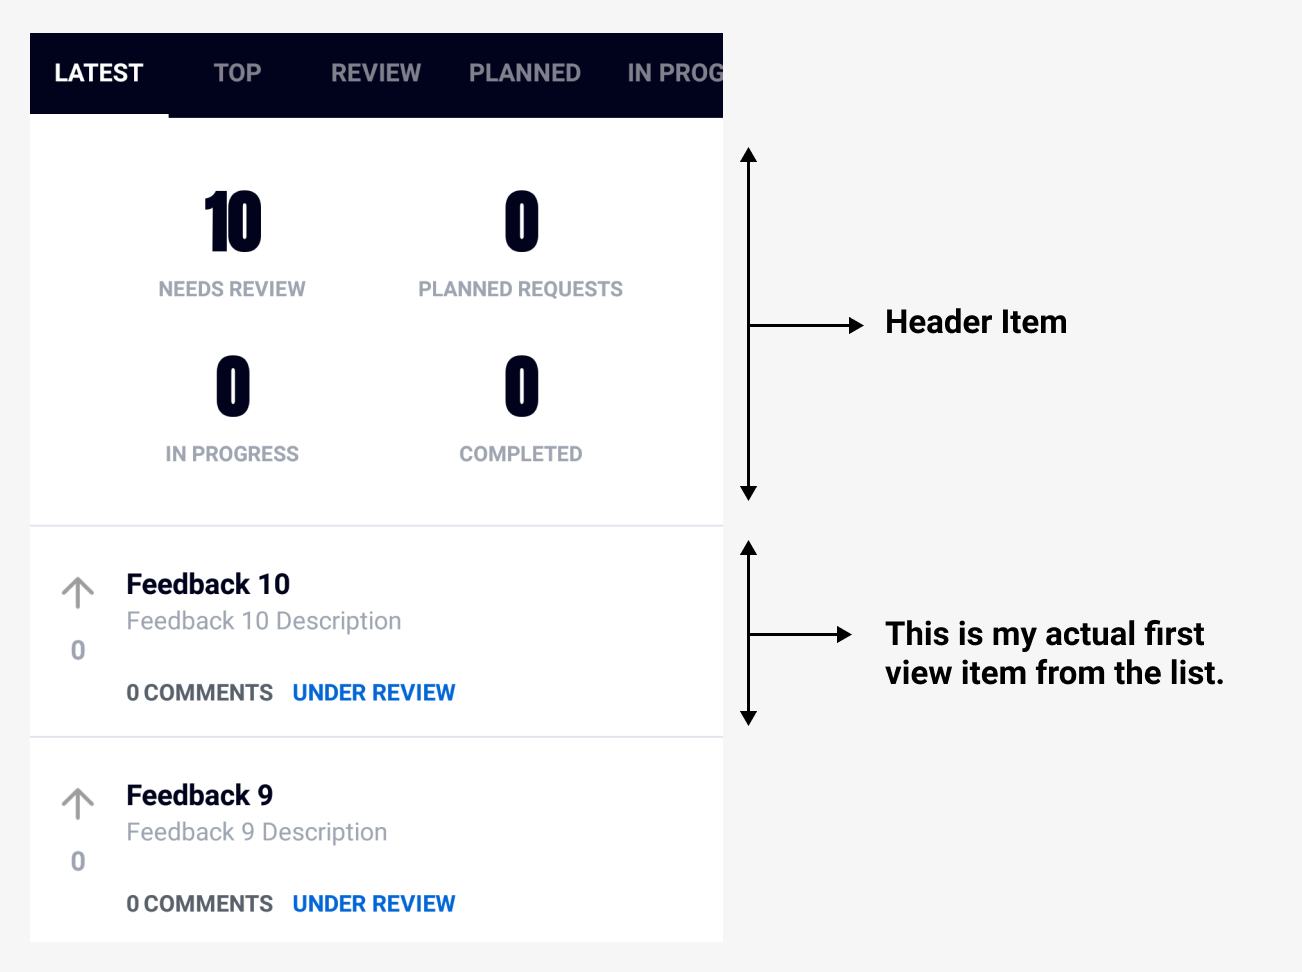
Have a look at the screenshots below to get an idea about what we are trying to achieve in this tutorial.
Misaligned viewitem output
Actual Output
Let's get started.
1. Adding Support Library
You need to add the following support libraries to gradle(Module.app) for Recyclerview to work in your project.
implementation 'com.android.support:recyclerview-v7:28.0.0'2. Creating Recyclerview
Use Recyclerview instance of listview for an improved experience and defining it in xml is quite simple. You can define it in xml as follows..
activity_main.xml
<RelativeLayout xmlns:android="http://schemas.android.com/apk/res/android" xmlns:tools="http://schemas.android.com/tools" android:layout_width="match_parent" android:layout_height="match_parent" android:paddingLeft="@dimen/activity_horizontal_margin" android:paddingRight="@dimen/activity_horizontal_margin" android:paddingTop="@dimen/activity_vertical_margin" android:paddingBottom="@dimen/activity_vertical_margin" tools:context=".MainActivity"> <android.support.v7.widget.RecyclerView android:id="@+id/my_recycler_view" android:scrollbars="vertical" android:layout_width="match_parent" android:layout_height="match_parent"> </android.support.v7.widget.RecyclerView></RelativeLayout>3. Create two different layouts for Header and Viewitem layout
Here we create two xml layout, one for header item and another one for viewitem.
Headerview holds the UI components needed to be shown in the header item.
Your code for Header item xml should be similar to the one below,
activity_headeritem.xml
<RelativeLayout xmlns:android="http://schemas.android.com/apk/res/android" xmlns:app="http://schemas.android.com/apk/res-auto" android:layout_width="match_parent" android:layout_height="wrap_content" >
<LinearLayout android:id="@+id/main_dashboard" android:layout_width="match_parent" android:layout_height="wrap_content" android:orientation="vertical" android:paddingTop="20dp"> <LinearLayout android:id="@+id/counts_layout" android:layout_width="match_parent" android:layout_height="wrap_content" android:orientation="vertical" android:paddingLeft="30dp" android:paddingRight="30dp" android:paddingBottom="30dp" > <LinearLayout android:layout_width="match_parent" android:layout_height="wrap_content" android:orientation="horizontal" android:weightSum="2"> <LinearLayout android:layout_width="0dp" android:layout_height="wrap_content" android:layout_weight="1" android:orientation="vertical">
<TextView android:id="@+id/review_needs_count_text" android:layout_width="match_parent" android:layout_height="wrap_content" android:gravity="center" android:textColor="@color/ThemePrimaryColor" android:textAppearance="@style/customfontstyle" android:textStyle="bold" />
<TextView android:id="@+id/review_needs_text" android:layout_width="wrap_content" android:layout_height="wrap_content" android:layout_gravity="center_horizontal" android:gravity="center_horizontal" android:text="NEEDS REVIEW" android:textColor="@color/disable_login_btn_bg" android:textSize="11sp" android:textStyle="bold"/>
</LinearLayout>
<LinearLayout android:layout_width="0dp" android:layout_height="wrap_content" android:layout_weight="1" android:orientation="vertical">
<TextView android:id="@+id/planned_requests_count_text" android:layout_width="match_parent" android:layout_height="wrap_content" android:gravity="center" android:textColor="@color/ThemePrimaryColor" android:textAppearance="@style/customfontstyle" android:textStyle="bold" />
<TextView android:id="@+id/inprogress_text" android:layout_width="wrap_content" android:layout_height="wrap_content" android:layout_gravity="center_horizontal" android:gravity="center_horizontal" android:text="PLANNED REQUESTS" android:textColor="@color/disable_login_btn_bg" android:textSize="11sp" android:textStyle="bold"/>
</LinearLayout>
</LinearLayout>
<LinearLayout android:layout_width="match_parent" android:layout_height="wrap_content" android:orientation="horizontal" android:layout_marginTop="10dp" android:weightSum="2">
<LinearLayout android:layout_width="0dp" android:layout_height="wrap_content" android:layout_weight="1" android:orientation="vertical">
<TextView android:id="@+id/inprogress_count_text" android:layout_width="match_parent" android:layout_height="wrap_content" android:gravity="center" android:textColor="@color/ThemePrimaryColor" android:textAppearance="@style/customfontstyle" android:textStyle="bold" />
<TextView android:id="@+id/completed_text" android:layout_width="wrap_content" android:layout_height="wrap_content" android:layout_gravity="center_horizontal" android:gravity="center_horizontal" android:text="IN PROGRESS" android:textStyle="bold" android:textColor="@color/disable_login_btn_bg" android:textSize="11sp" />
</LinearLayout>
<LinearLayout android:layout_width="0dp" android:layout_height="wrap_content" android:layout_weight="1" android:orientation="vertical">
<TextView android:id="@+id/completed_count_text" android:layout_width="match_parent" android:layout_height="wrap_content" android:gravity="center" android:textColor="@color/ThemePrimaryColor" android:textAppearance="@style/customfontstyle" android:textStyle="bold" />
<TextView android:id="@+id/planned_requests_text" android:layout_width="wrap_content" android:layout_height="wrap_content" android:layout_gravity="center_horizontal" android:gravity="center_horizontal" android:text="COMPLETED" android:textColor="@color/disable_login_btn_bg" android:textSize="11sp" android:textStyle="bold"/> </LinearLayout> </LinearLayout> </LinearLayout> </LinearLayout></RelativeLayout>Similar to the Headerview, Listview Items holds the UI components for the view items.
I have attached the xml code for the Listview item below,
activity_listviewitem.xml
<RelativeLayout xmlns:android="http://schemas.android.com/apk/res/android" android:layout_width="match_parent" android:layout_height="wrap_content" xmlns:app="http://schemas.android.com/apk/res-auto" >
<LinearLayout android:id="@+id/latest_content_layout" android:layout_width="match_parent" android:layout_height="wrap_content" android:orientation="horizontal" android:weightSum="2" android:paddingTop="15dp" android:paddingRight="20dp" android:paddingBottom="15dp" android:paddingLeft="5dp" >
<LinearLayout android:layout_width="wrap_content" android:layout_height="wrap_content" android:orientation="vertical" android:layout_gravity="center_horizontal" >
<com.like.LikeButton android:id="@+id/upward_image" android:layout_width="40dp" android:layout_height="40dp" app:icon_size="25dp" app:anim_scale_factor="2" app:like_drawable="@drawable/arrow_up_colored" app:unlike_drawable="@drawable/arrow_up_icon" android:layout_gravity="center_horizontal" app:circle_start_color="@color/ThemeColor" app:dots_primary_color="@color/ThemeColor" app:dots_secondary_color="@color/ThemeColor" app:circle_end_color="@color/ThemeColor"/>
<TextView android:id="@+id/count_upward_text" android:layout_width="wrap_content" android:layout_height="wrap_content" style="@style/UpvoteTextStyle" android:layout_gravity="center_horizontal" />
</LinearLayout>
<LinearLayout android:id="@+id/latest_feed_layout" android:layout_width="wrap_content" android:layout_height="wrap_content" android:orientation="vertical" android:layout_marginTop="5dp" android:layout_marginLeft="5dp" android:layout_weight="1.8">
<TextView android:id="@+id/latest_tab_title_text" android:layout_width="match_parent" android:layout_height="wrap_content" style="@style/TitletextStyle" />
<TextView android:id="@+id/latest_tab_descrip_text" android:layout_width="match_parent" android:layout_height="wrap_content" android:maxLines="3" style="@style/DescriptiontextStyle" />
<LinearLayout android:layout_width="match_parent" android:layout_height="wrap_content" android:orientation="horizontal" android:layout_marginTop="5dp">
<TextView android:id="@+id/comment_count_text" android:layout_width="wrap_content" android:layout_height="wrap_content" style="@style/CommentstextStyle" />
<TextView android:layout_width="wrap_content" android:layout_height="wrap_content" android:text="@string/comments_text" style="@style/CommentstextStyle" />
<TextView android:id="@+id/latest_tab_status_text" android:layout_width="wrap_content" android:layout_height="wrap_content" style="@style/StatusTextStyle" android:textColor="@color/inprogress_status_color"/> </LinearLayout> </LinearLayout> </LinearLayout></RelativeLayout>4. CustomAdapterclass.java
We have achieved adding the header item to recyclerview by using the viewtype property. So now we will create custom adapter for Recyclerview. In onCreateViewHolder method, we have to use two inflate methods, which will help you to define your layout.xml. You should extend your adapter with "RecyclerView.Adapter" which follows the viewtype property.
CustomAdapter.java
public class CustomAdapter extends RecyclerView.Adapter<RecyclerView.ViewHolder> {
private static final int TYPE_HEADER:0; private static final int TYPE_ITEM:1;
private List<ViewItemsModel> viewitemlists; private Context context;
public CustomAdapter(Context context, List<ViewItemsModel> viewitemlists) { this.context:context; this.viewitemlists:viewitemlists; }
@Override public RecyclerView.ViewHolder onCreateViewHolder(ViewGroup parent, int viewType) { if (viewType == TYPE_ITEM) { // Here Inflating your recyclerview item layout View itemView:LayoutInflater.from(parent.getContext()).inflate(R.layout.activity_listviewitem, parent, false); return new ItemViewHolder(itemView); } else if (viewType == TYPE_HEADER) { // Here Inflating your header view View itemView:LayoutInflater.from(parent.getContext()).inflate(R.layout.activity_headeritem, parent, false); return new HeaderViewHolder(itemView); } else return null; }
@Override public void onBindViewHolder(final RecyclerView.ViewHolder holder, int position) {
if (holder instanceof HeaderViewHolder){ setheadersdata_flag:true; HeaderViewHolder headerViewHolder:(HeaderViewHolder) holder;
// You have to set your header items values with the help of model class and you can modify as per your needs
headerViewHolder.txt_needsreview.setText("YOUR _HEADERVIEW_STRING");
} else if (holder instanceof ItemViewHolder){
final ItemViewHolder itemViewHolder:(ItemViewHolder) holder;
// Following code give a row of header and decrease the one position from listview items final LatestTabModel.ViewItemsModel data:latestlists.get(position-1);
// You have to set your listview items values with the help of model class and you can modify as per your needs
itemViewHolder.title.setText(data.getTitle());
} }
@Override public int getItemViewType(int position) { if (position == 0) { return TYPE_HEADER; } return TYPE_ITEM; }
// getItemCount increasing the position to 1. This will be the row of header @Override public int getItemCount() { return latestlists.size()+1; }
private class HeaderViewHolder extends RecyclerView.ViewHolder { TextView txt_needsreview,txt_planned,txt_inprogress,txt_completed;
public HeaderViewHolder(View view) { super(view); txt_needsreview:(TextView) view.findViewById(R.id.review_needs_count_text); txt_planned:(TextView) view.findViewById(R.id.planned_requests_count_text); txt_inprogress:(TextView) view.findViewById(R.id.inprogress_count_text); txt_completed:(TextView) view.findViewById(R.id.completed_count_text); } }
public class ItemViewHolder extends RecyclerView.ViewHolder {
TextView title,description,upward_count,comment_count,status; LinearLayout latest_feed_layout; LikeButton upvote_image; public ItemViewHolder(View itemView) { super(itemView);
title:(TextView) itemView.findViewById(R.id.latest_tab_title_text); description:(TextView) itemView.findViewById(R.id.latest_tab_descrip_text); upward_count:(TextView) itemView.findViewById(R.id.count_upward_text); comment_count:(TextView) itemView.findViewById(R.id.comment_count_text); status:(TextView) itemView.findViewById(R.id.latest_tab_status_text); latest_feed_layout:(LinearLayout) itemView.findViewById(R.id.latest_feed_layout); upvote_image:(LikeButton) itemView.findViewById(R.id.upward_image);
} } }getItemViewType() provides the viewtype property to Recyclerview, which helps with scrolling the Recyclerview.
getItemCount() increases the list item position by one (listitem + 1). It provides the row under the header.
5. MainActivity.java
In this class, we have to pass the adapter class of Recyclerview to complete the scrolling function. Finally, we achieve the complete function of Recyclerview with Header view.
MainActivity.java
public class MainActivity extends AppCompatActivity {
RecyclerView recyclerView; LinearLayoutManager linearLayoutManager; @Override protected void onCreate(Bundle savedInstanceState) { super.onCreate(savedInstanceState); setContentView(R.layout.activity_main); recyclerView:(RecyclerView)findViewById(R.id.my_recycler_view); linearLayoutManager:new LinearLayoutManager(this); MyRecyclerAdapter adapter:new MyRecyclerAdapter(getActivity(), getListViewItems()); recyclerView.setLayoutManager(linearLayoutManager); recyclerView.setAdapter(adapter); }}This brings us to the end of this tutorial. I hope that you have learned how to create a recyclerview for your android app. Now, you can run this on your android device and see the output for yourself. This output seems to be exactly what you want.