Hyperledger Fabric is an enterprise grade framework for building permissioned blockchain networks. It's a project supported and managed by the Linux Foundation. If you're getting started with HL Fabric I'd strongly recommend you to read our previous articles to understand the architecture.
Terminologies
Before getting started with this, I'll explain what exactly are channels and chaincodes.
Channels
Channels are the state store of an blockchain network which hold the application data generated during the lifecycle of the system. It's used to store information like user data, purchase data, order data, invoices and more. In a Fabric network there can be multiple channels to provide privacy and security to the parties involved.
For instance if there are two parties who want have some data shared only between them, they can create a channel and store the corresponding information within that channel so that none of the other participants will be able to see that data.
Chaincodes
Chaincodes are the smart contracts that validate the each transaction that execute on the peer node. In a Fabric network chaincodes are the business logic to decide on what to be done on some data. Similar to channels, chaincodes can also be multiple in a network which helps to abstract the functional aspect of the network so that only allowed organizations will be able to invoke the chaincode.
For instance in a supply chain network, all the organizations will be able to record the sale data but only one organization will be managing and monitoring the entire network like an admin. Thus we can have one chaincode for the supplychain logic and one for admin operations like adding a new organization.
Since HL Fabric is a enterprise grade blockchain framework, it provides a lot of options for imparting security on to your network, one important feature being the multi ledger and multi channel network. This article will help you understand how to setup an Fabric network that involves multiple chaincodes and multiple channels.
Prerequisites
Before proceeding to the setting up part, please make sure the following processes are performed.
Installing Docker
Since entire Hyperledger Fabric is running on Docker, it's necessary that you've it installed in your development machine.
Pulling the Images
Once you've installed the docker, pull the Hyperledger Fabric images from the repository with the following commands.
docker pull hyperledger/fabric-tools:x86_64-1.1.0docker pull hyperledger/fabric-orderer:x86_64-1.1.0docker pull hyperledger/fabric-peer:x86_64-1.1.0docker pull hyperledger/fabric-javaenv:x86_64-1.1.0docker pull hyperledger/fabric-ccenv:x86_64-1.1.0docker pull hyperledger/fabric-ca:x86_64-1.1.0docker pull hyperledger/fabric-couchdb:x86_64-0.4.6And tag them as latest,
docker tag hyperledger/fabric-ca:x86_64-1.1.0 hyperledger/fabric-ca:latestdocker tag hyperledger/fabric-tools:x86_64-1.1.0 hyperledger/fabric-tools:latestdocker tag hyperledger/fabric-orderer:x86_64-1.1.0 hyperledger/fabric-orderer:latestdocker tag hyperledger/fabric-peer:x86_64-1.1.0 hyperledger/fabric-peer:latestdocker tag hyperledger/fabric-javaenv:x86_64-1.1.0 hyperledger/fabric-javaenv:latestdocker tag hyperledger/fabric-ccenv:x86_64-1.1.0 hyperledger/fabric-ccenv:latestdocker tag hyperledger/fabric-couchdb:x86_64-0.4.6 hyperledger/fabric-couchdb:latestFinally verify by listing the docker images to check if everything is installed correctly.
docker images | grep hyperledger/fabricDefining the Architecture
In our current example, we'll be having the following components.
- 1 Orderer (orderer.example.com)
- 2 Organizations (org1, org2)
- 1 Peer per organization (peer0.org1.example.com, peer0.org2.example.com)
- 1 cli (fabric-tools)
This setup is mainly to make the process simpler. However, in production you'll be having a much more complex setup for scalability. Also there will be cli container to create channels, join them and also install and instantiate chaincodes.
And we'll be having two channels (channelone & channeltwo) and two chaincodes (firstchaincode & secondchaincode). Here the firstchaincode will be installed in channelone of Org1 & Org2 and the secondchaincode will be installed in channeltwo of Org2 alone. Thus secondchaincode and channeltwo will be a private one for Org2 alone.
Setting Up The Environment
As the first step, we need to create few basic things that is needed for running the Fabric network. Create a new folder in a suitable location.
mkdir multichain_networkcd multichain_networkPulling Platform Tools The platform tools are necessary to create the certificates and configuration transaction blocks to setup the network. It's specific to each platform thus you need to manually download it with the following script.
curl -sSL https://goo.gl/6wtTN5 | bash -s 1.1.0This will create a bin folder in the current location, which contains the tools for the corresponding operations.
Next step is to create the following files and its content to start the network
- docker-composer.yml - Which has our docker container's configurations
- crypto-config.yml - Which has the orderers and peers informations for generating the certificiates
- configtx.yaml - That has the configuration information for building the genesis block and channel transaction files.
touch docker-composer.ymltouch crypto-config.ymltouch configtx.yamlDocker Container Configuration
The containers are defined in the Docker compose file. This holds the configuration for the architecture. Copy paste the below content docker-compose.yml
version: '2'networks: byfn:services:
orderer.example.com: container_name: orderer.example.com image: hyperledger/fabric-orderer environment: - ORDERER_GENERAL_LOGLEVEL=debug - ORDERER_GENERAL_LISTENADDRESS=0.0.0.0 - ORDERER_GENERAL_GENESISMETHOD=file - ORDERER_GENERAL_GENESISFILE=/var/hyperledger/orderer/orderer.genesis.block - ORDERER_GENERAL_LOCALMSPID=OrdererMSP - ORDERER_GENERAL_LOCALMSPDIR=/var/hyperledger/orderer/msp - ORDERER_GENERAL_TLS_ENABLED=true - ORDERER_GENERAL_TLS_PRIVATEKEY=/var/hyperledger/orderer/tls/server.key - ORDERER_GENERAL_TLS_CERTIFICATE=/var/hyperledger/orderer/tls/server.crt - ORDERER_GENERAL_TLS_ROOTCAS=[/var/hyperledger/orderer/tls/ca.crt] working_dir: /opt/gopath/src/github.com/hyperledger/fabric command: orderer volumes: - ./channel-artifacts/genesis.block:/var/hyperledger/orderer/orderer.genesis.block - ./crypto-config/ordererOrganizations/example.com/orderers/orderer.example.com/msp:/var/hyperledger/orderer/msp - ./crypto-config/ordererOrganizations/example.com/orderers/orderer.example.com/tls/:/var/hyperledger/orderer/tls ports: - 7050:7050 networks: - byfn
peer0.org1.example.com: image: hyperledger/fabric-peer container_name: peer0.org1.example.com environment: - CORE_PEER_ID=peer0.org1.example.com - CORE_PEER_ADDRESS=peer0.org1.example.com:7051 - CORE_PEER_GOSSIP_BOOTSTRAP=peer0.org1.example.com:7051 - CORE_PEER_LOCALMSPID=Org1MSP - CORE_VM_ENDPOINT=unix:///host/var/run/docker.sock - CORE_VM_DOCKER_HOSTCONFIG_NETWORKMODE=multichain_network_byfn - CORE_LOGGING_LEVEL=DEBUG - CORE_PEER_TLS_ENABLED=true - CORE_PEER_GOSSIP_USELEADERELECTION=true - CORE_PEER_GOSSIP_ORGLEADER=false - CORE_PEER_PROFILE_ENABLED=true - CORE_PEER_TLS_CERT_FILE=/etc/hyperledger/fabric/tls/server.crt - CORE_PEER_TLS_KEY_FILE=/etc/hyperledger/fabric/tls/server.key - CORE_PEER_TLS_ROOTCERT_FILE=/etc/hyperledger/fabric/tls/ca.crt - CORE_LEDGER_STATE_STATEDATABASE=CouchDB - CORE_LEDGER_STATE_COUCHDBCONFIG_COUCHDBADDRESS=couchdb0:5984 - CORE_LEDGER_STATE_COUCHDBCONFIG_USERNAME= - CORE_LEDGER_STATE_COUCHDBCONFIG_PASSWORD= depends_on: - couchdb0 working_dir: /opt/gopath/src/github.com/hyperledger/fabric/peer command: peer node start volumes: - /var/run/:/host/var/run/ - ./crypto-config/peerOrganizations/org1.example.com/peers/peer0.org1.example.com/msp:/etc/hyperledger/fabric/msp - ./crypto-config/peerOrganizations/org1.example.com/peers/peer0.org1.example.com/tls:/etc/hyperledger/fabric/tls ports: - 7051:7051 - 7053:7053 networks: - byfn
peer0.org2.example.com: image: hyperledger/fabric-peer container_name: peer0.org2.example.com environment: - CORE_PEER_ID=peer0.org2.example.com - CORE_PEER_ADDRESS=peer0.org2.example.com:7051 - CORE_PEER_GOSSIP_BOOTSTRAP=peer0.org2.example.com:7051 - CORE_PEER_LOCALMSPID=Org2MSP - CORE_VM_ENDPOINT=unix:///host/var/run/docker.sock - CORE_VM_DOCKER_HOSTCONFIG_NETWORKMODE=multichain_network_byfn - CORE_LOGGING_LEVEL=DEBUG - CORE_PEER_TLS_ENABLED=true - CORE_PEER_GOSSIP_USELEADERELECTION=true - CORE_PEER_GOSSIP_ORGLEADER=false - CORE_PEER_PROFILE_ENABLED=true - CORE_PEER_TLS_CERT_FILE=/etc/hyperledger/fabric/tls/server.crt - CORE_PEER_TLS_KEY_FILE=/etc/hyperledger/fabric/tls/server.key - CORE_PEER_TLS_ROOTCERT_FILE=/etc/hyperledger/fabric/tls/ca.crt - CORE_LEDGER_STATE_STATEDATABASE=CouchDB - CORE_LEDGER_STATE_COUCHDBCONFIG_COUCHDBADDRESS=couchdb1:5984 - CORE_LEDGER_STATE_COUCHDBCONFIG_USERNAME= - CORE_LEDGER_STATE_COUCHDBCONFIG_PASSWORD= depends_on: - couchdb1 working_dir: /opt/gopath/src/github.com/hyperledger/fabric/peer command: peer node start volumes: - /var/run/:/host/var/run/ - ./crypto-config/peerOrganizations/org2.example.com/peers/peer0.org2.example.com/msp:/etc/hyperledger/fabric/msp - ./crypto-config/peerOrganizations/org2.example.com/peers/peer0.org2.example.com/tls:/etc/hyperledger/fabric/tls ports: - 8051:7051 - 8053:7053 networks: - byfn
couchdb0: container_name: couchdb0 image: hyperledger/fabric-couchdb environment: - COUCHDB_USER= - COUCHDB_PASSWORD= ports: - "5984:5984" networks: - byfn
couchdb1: container_name: couchdb1 image: hyperledger/fabric-couchdb environment: - COUCHDB_USER= - COUCHDB_PASSWORD= ports: - "6984:5984" networks: - byfn
cli: container_name: cli image: hyperledger/fabric-tools tty: true environment: - GOPATH=/opt/gopath - CORE_VM_ENDPOINT=unix:///host/var/run/docker.sock - CORE_LOGGING_LEVEL=DEBUG - CORE_PEER_ID=cli - CORE_PEER_ADDRESS=peer0.org1.example.com:7051 - CORE_PEER_LOCALMSPID=Org1MSP - CORE_PEER_TLS_ENABLED=true - CORE_PEER_TLS_CERT_FILE=/opt/gopath/src/github.com/hyperledger/fabric/peer/crypto/peerOrganizations/org1.example.com/peers/peer0.org1.example.com/tls/server.crt - CORE_PEER_TLS_KEY_FILE=/opt/gopath/src/github.com/hyperledger/fabric/peer/crypto/peerOrganizations/org1.example.com/peers/peer0.org1.example.com/tls/server.key - CORE_PEER_TLS_ROOTCERT_FILE=/opt/gopath/src/github.com/hyperledger/fabric/peer/crypto/peerOrganizations/org1.example.com/peers/peer0.org1.example.com/tls/ca.crt - CORE_PEER_MSPCONFIGPATH=/opt/gopath/src/github.com/hyperledger/fabric/peer/crypto/peerOrganizations/org1.example.com/users/Admin@org1.example.com/msp working_dir: /opt/gopath/src/github.com/hyperledger/fabric/peer command: /bin/bash -c 'sleep 1000' volumes: - /var/run:/host/var/run/ - ./crypto-config:/opt/gopath/src/github.com/hyperledger/fabric/peer/crypto/ - ./chaincode:/opt/gopath/src/github.com/chaincode - ./channel-artifacts:/opt/gopath/src/github.com/hyperledger/fabric/peer/channel-artifacts networks: - byfnCrypto Config
OrdererOrgs: - Name: Orderer Domain: example.com Specs: - Hostname: ordererPeerOrgs: - Name: Org1 Domain: org1.example.com EnableNodeOUs: true Template: Count: 1 Users: Count: 1 - Name: Org2 Domain: org2.example.com EnableNodeOUs: true Template: Count: 1 Users: Count: 1Configtx.yaml
---Profiles: OrdererGenesis: Capabilities: <<: *ChannelCapabilities Orderer: <<: *OrdererDefaults Organizations: - *OrdererOrg Capabilities: <<: *OrdererCapabilities Consortiums: SampleConsortium: Organizations: - *Org1 - *Org2
ChannelOne: Consortium: SampleConsortium Application: <<: *ApplicationDefaults Organizations: - *Org1 - *Org2
Capabilities: <<: *ApplicationCapabilities
ChannelTwo: Consortium: SampleConsortium Application: <<: *ApplicationDefaults Organizations: - *Org2
Capabilities: <<: *ApplicationCapabilities
Organizations:
- &OrdererOrg Name: OrdererOrg ID: OrdererMSP MSPDir: crypto-config/ordererOrganizations/example.com/msp
- &Org1 Name: Org1MSP ID: Org1MSP MSPDir: crypto-config/peerOrganizations/org1.example.com/msp AnchorPeers: - Host: peer0.org1.example.com Port: 7051
- &Org2 Name: Org2MSP ID: Org2MSP MSPDir: crypto-config/peerOrganizations/org2.example.com/msp AnchorPeers: - Host: peer0.org2.example.com Port: 7051
Orderer: &OrdererDefaults OrdererType: solo Addresses: - orderer.example.com:7050 BatchTimeout: 2s BatchSize: MaxMessageCount: 10 AbsoluteMaxBytes: 99 MB PreferredMaxBytes: 512 KB
Kafka: Brokers: - 127.0.0.1:9092 Organizations:
Application: &ApplicationDefaults Organizations:
Capabilities: Global: &ChannelCapabilities V1_1: true
Orderer: &OrdererCapabilities V1_1: true
Application: &ApplicationCapabilities V1_1: trueAs we mentioned above, we've create profiles for two channels ChannelOne and ChannelTwo. This will be used for generating channel transaction blocks in the following steps.
Set the Environment Variables
Before proceeding to the scripts, for easier usage I've used bunch of environment variables that will be used in the scripts. Export them in your terminal before proceeding to the scripts.
export CHANNEL_ONE_NAME=channeloneexport CHANNEL_ONE_PROFILE=ChannelOneexport CHANNEL_TWO_NAME=channeltwoexport CHANNEL_TWO_PROFILE=ChannelTwoexport ORDERER_CA=/opt/gopath/src/github.com/hyperledger/fabric/peer/crypto/ordererOrganizations/example.com/orderers/orderer.example.com/msp/tlscacerts/tlsca.example.com-cert.pemGenerating the Certificates & Configuration Transaction Blocks
After defining the configuration, let's get on to generating the certificates and the transactions blocks.
Generate Certificates
We'll be using the cryptogen tool to generate the certificates for the defined organisations and users. It takes the crypto-config.yaml file as input and generates the certificates in crypto-config folder.
./bin/cryptogen generate --config=./crypto-config.yamlGenerate Genesis Block
After generating the certificates, we have to create the first block of our network which is called the genesis block. We'll be using the configtxgen tool to generate it from configtx.yaml.
./bin/configtxgen -profile OrdererGenesis -outputBlock ./channel-artifacts/genesis.blockGenerate Channel Transactions For each channel we will have to create a config transaction which is will be used when creating the channel.
# generate channel configuration transaction for channelone./bin/configtxgen -profile ${CHANNEL_ONE_PROFILE} -outputCreateChannelTx ./channel-artifacts/${CHANNEL_ONE_NAME}.tx -channelID $CHANNEL_ONE_NAME
# generate channel configuration transaction for channeltwo./bin/configtxgen -profile ${CHANNEL_TWO_PROFILE} -outputCreateChannelTx ./channel-artifacts/${CHANNEL_TWO_NAME}.tx -channelID $CHANNEL_TWO_NAMEGenerate Anchor Peer Update Profile In order to update a peer to anchor peer, we have to create a transaction block signed by the corresponding OrgMSP.
# generate anchor peer for channelone transaction of org1./bin/configtxgen -profile ${CHANNEL_ONE_PROFILE} -outputAnchorPeersUpdate ./channel-artifacts/Org1MSPanchors_${CHANNEL_ONE_NAME}.tx -channelID $CHANNEL_ONE_NAME -asOrg Org1MSP
# generate anchor peer for channelone channel transaction of org2./bin/configtxgen -profile ${CHANNEL_ONE_PROFILE} -outputAnchorPeersUpdate ./channel-artifacts/Org2MSPanchors_${CHANNEL_ONE_NAME}.tx -channelID $CHANNEL_ONE_NAME -asOrg Org2MSP
# generate anchor peer for channeltwo transaction of org2./bin/configtxgen -profile ${CHANNEL_TWO_PROFILE} -outputAnchorPeersUpdate ./channel-artifacts/Org2MSPanchors_${CHANNEL_TWO_NAME}.tx -channelID $CHANNEL_TWO_NAME -asOrg Org2MSAfter completing these steps you can see that there will be two newly created folders in your project repo, the channel-artifacts & crypto-config. As you can see in the docker-compose file, these will be mounted in the peer and orderer volumes for the certificates to consume during the function of each of the nodes.
Starting The Network
Since we have all the certificates now, we can start all the components of the Fabric network. All we have to do is to start the docker services defined the docker-compose file.
docker-compose -f docker-compose.yml up -dAfter this command is executed successfully, just check if everything is running with the following command.
docker psThis will return all the running Docker containers and make sure you have 1 orderer, 2 peers, 2 couchdb and a cli running.
Channel Creation & Joining
We'll be using the cli container to create and join the channels. While executing the commands from the cli container, the commands will be executed as a peer based on the environment variables set in the cli container. Since we have defined the Org1MSP as the default variable all the commands executed from the cli will be run as Org1 peers and when we need to change it to some other organization, we need to pass the corresponding environment variables during docker exec.
Creating Channel One as Org1 Peer
The channel creation is done by using the transaction tx that's created in channel-artifacts folder.
docker exec cli peer channel create -o orderer.example.com:7050 -c $CHANNEL_ONE_NAME -f /opt/gopath/src/github.com/hyperledger/fabric/peer/channel-artifacts/${CHANNEL_ONE_NAME}.tx --tls --cafile $ORDERER_CAJoin the Channel One as Org1 Peer
After you create the channel, a new file named channelone.block will be created in the cli container which will be used to join the peer to the channel.
docker exec cli peer channel join -b ${CHANNEL_ONE_NAME}.block --tls --cafile $ORDERER_CAJoin the Channel One as Org2 Peer
Similarly we'll change the environment variables to make the cli act as Org2 Peers and join the channel.
docker exec -e "CORE_PEER_LOCALMSPID=Org2MSP" -e "CORE_PEER_TLS_ROOTCERT_FILE=/opt/gopath/src/github.com/hyperledger/fabric/peer/crypto/peerOrganizations/org2.example.com/peers/peer0.org2.example.com/tls/ca.crt" -e "CORE_PEER_MSPCONFIGPATH=/opt/gopath/src/github.com/hyperledger/fabric/peer/crypto/peerOrganizations/org2.example.com/users/[email protected]/msp" -e "CORE_PEER_ADDRESS=peer0.org2.example.com:7051" cli peer channel join -b ${CHANNEL_ONE_NAME}.block --tls --cafile $ORDERER_CAUpdate the Anchor Peers in Channel One
After joining the channel, we've to update the peers of each organization that will be acting as the anchor peer. In order to do that we'll be using the anchorpeerupdate tx file that's generated.
Org1 Peer
docker exec cli peer channel update -o orderer.example.com:7050 -c $CHANNEL_ONE_NAME -f /opt/gopath/src/github.com/hyperledger/fabric/peer/channel-artifacts/Org1MSPanchors_${CHANNEL_ONE_NAME}.tx --tls --cafile $ORDERER_CAOrg2 Peer
docker exec -e "CORE_PEER_LOCALMSPID=Org2MSP" -e "CORE_PEER_TLS_ROOTCERT_FILE=/opt/gopath/src/github.com/hyperledger/fabric/peer/crypto/peerOrganizations/org2.example.com/peers/peer0.org2.example.com/tls/ca.crt" -e "CORE_PEER_MSPCONFIGPATH=/opt/gopath/src/github.com/hyperledger/fabric/peer/crypto/peerOrganizations/org2.example.com/users/[email protected]/msp" -e "CORE_PEER_ADDRESS=peer0.org2.example.com:7051" cli peer channel update -o orderer.example.com:7050 -c $CHANNEL_ONE_NAME -f /opt/gopath/src/github.com/hyperledger/fabric/peer/channel-artifacts/Org2MSPanchors_${CHANNEL_ONE_NAME}.tx --tls --cafile $ORDERER_CACreating Channel Two as Org2 Peer
docker exec -e "CORE_PEER_LOCALMSPID=Org2MSP" -e "CORE_PEER_TLS_ROOTCERT_FILE=/opt/gopath/src/github.com/hyperledger/fabric/peer/crypto/peerOrganizations/org2.example.com/peers/peer0.org2.example.com/tls/ca.crt" -e "CORE_PEER_MSPCONFIGPATH=/opt/gopath/src/github.com/hyperledger/fabric/peer/crypto/peerOrganizations/org2.example.com/users/[email protected]/msp" -e "CORE_PEER_ADDRESS=peer0.org2.example.com:7051" cli peer channel create -o orderer.example.com:7050 -c $CHANNEL_TWO_NAME -f /opt/gopath/src/github.com/hyperledger/fabric/peer/channel-artifacts/${CHANNEL_TWO_NAME}.tx --tls --cafile $ORDERER_CAJoining Channel Two as Org2 Peer
docker exec -e "CORE_PEER_LOCALMSPID=Org2MSP" -e "CORE_PEER_TLS_ROOTCERT_FILE=/opt/gopath/src/github.com/hyperledger/fabric/peer/crypto/peerOrganizations/org2.example.com/peers/peer0.org2.example.com/tls/ca.crt" -e "CORE_PEER_MSPCONFIGPATH=/opt/gopath/src/github.com/hyperledger/fabric/peer/crypto/peerOrganizations/org2.example.com/users/[email protected]/msp" -e "CORE_PEER_ADDRESS=peer0.org2.example.com:7051" cli peer channel join -b ${CHANNEL_TWO_NAME}.block --tls --cafile $ORDERER_CAUpdate the Anchor Peers in Channel Two
docker exec -e "CORE_PEER_LOCALMSPID=Org2MSP" -e "CORE_PEER_TLS_ROOTCERT_FILE=/opt/gopath/src/github.com/hyperledger/fabric/peer/crypto/peerOrganizations/org2.example.com/peers/peer0.org2.example.com/tls/ca.crt" -e "CORE_PEER_MSPCONFIGPATH=/opt/gopath/src/github.com/hyperledger/fabric/peer/crypto/peerOrganizations/org2.example.com/users/[email protected]/msp" -e "CORE_PEER_ADDRESS=peer0.org2.example.com:7051" cli peer channel update -o orderer.example.com:7050 -c $CHANNEL_TWO_NAME -f /opt/gopath/src/github.com/hyperledger/fabric/peer/channel-artifacts/Org2MSPanchors_${CHANNEL_TWO_NAME}.tx --tls --cafile $ORDERER_CAInstalling and Instantiating the Chaincodes
As per our architecture, we have created two channels and now we have to installed the corresponding chaincodes in the corresponding channels.
In our current example, we have two chaincodes each under ./chaincode/one & ./chaincode/two in the root folder. Also we have mounted the entire folder into the cli container under,
/opt/gopath/src/github.com/chaincodeExport Chaincode Name And Location Variables
We'll store the chaincode name and the path in the environment variable to access it easily
export FIRST_CHAINCODE_NAME="firstchaincode"export FIRST_CHAINCODE_SRC="github.com/chaincode/one"export SECOND_CHAINCODE_NAME="secondchaincode"export SECOND_CHAINCODE_SRC="github.com/chaincode/two"export CHAINCODE_VERSION="1.0"Install Chaincode (firstchaincode) in Org1 Peer
For installing the chaincode we'll use peer chaincode install command, and we have to pass the name, location and the version of the chaincode to be installed. This process will install the runtime for the chaincode.
docker exec cli peer chaincode install -n $FIRST_CHAINCODE_NAME -p $FIRST_CHAINCODE_SRC -v $CHAINCODE_VERSIONInstantiate Chaincode (firstchaincode) in Org1 Peer
After installing the chaincode runtime, we have to instantiate to make it functional. This command needs TLS signing for the verification of the installer. The chaincode will be instantiated in the channelone of the network,
docker exec cli peer chaincode instantiate -o orderer.example.com:7050 --tls --cafile $ORDERER_CA -C $CHANNEL_ONE_NAME -c '{"Args":[]}' -n $FIRST_CHAINCODE_NAME -v $CHAINCODE_VERSION -P "OR('Org1MSP.member', 'Org2MSP.member')"Install Chaincode (firstchaincode) in Org2 Peer
docker exec -e "CORE_PEER_LOCALMSPID=Org2MSP" -e "CORE_PEER_TLS_ROOTCERT_FILE=/opt/gopath/src/github.com/hyperledger/fabric/peer/crypto/peerOrganizations/org2.example.com/peers/peer0.org2.example.com/tls/ca.crt" -e "CORE_PEER_MSPCONFIGPATH=/opt/gopath/src/github.com/hyperledger/fabric/peer/crypto/peerOrganizations/org2.example.com/users/[email protected]/msp" -e "CORE_PEER_ADDRESS=peer0.org2.example.com:7051" cli peer chaincode install -n $FIRST_CHAINCODE_NAME -p $FIRST_CHAINCODE_SRC -v $CHAINCODE_VERSIONInstantiate Chaincode (firstchaincode) in Org2 Peer
docker exec -e "CORE_PEER_LOCALMSPID=Org2MSP" -e "CORE_PEER_TLS_ROOTCERT_FILE=/opt/gopath/src/github.com/hyperledger/fabric/peer/crypto/peerOrganizations/org2.example.com/peers/peer0.org2.example.com/tls/ca.crt" -e "CORE_PEER_MSPCONFIGPATH=/opt/gopath/src/github.com/hyperledger/fabric/peer/crypto/peerOrganizations/org2.example.com/users/[email protected]/msp" -e "CORE_PEER_ADDRESS=peer0.org2.example.com:7051" cli peer chaincode instantiate -o orderer.example.com:7050 --tls --cafile $ORDERER_CA -C $CHANNEL_ONE_NAME -c '{"Args":[]}' -n $FIRST_CHAINCODE_NAME -v $CHAINCODE_VERSION -P "OR('Org1MSP.member', 'Org2MSP.member')"Install & Instantiate (secondchaincode) in Org2 Peer
The second chaincode is the private one (Like admin chaincode). This will be installed in only a specific organisation which will have rights to share the data. Thus in our scenario, we'll install it only in Org2 peers and in channeltwo of the network.
docker exec -e "CORE_PEER_LOCALMSPID=Org2MSP" -e "CORE_PEER_TLS_ROOTCERT_FILE=/opt/gopath/src/github.com/hyperledger/fabric/peer/crypto/peerOrganizations/org2.example.com/peers/peer0.org2.example.com/tls/ca.crt" -e "CORE_PEER_MSPCONFIGPATH=/opt/gopath/src/github.com/hyperledger/fabric/peer/crypto/peerOrganizations/org2.example.com/users/[email protected]/msp" -e "CORE_PEER_ADDRESS=peer0.org2.example.com:7051" cli peer chaincode install -n $SECOND_CHAINCODE_NAME -p $SECOND_CHAINCODE_SRC -v $CHAINCODE_VERSION
docker exec -e "CORE_PEER_LOCALMSPID=Org2MSP" -e "CORE_PEER_TLS_ROOTCERT_FILE=/opt/gopath/src/github.com/hyperledger/fabric/peer/crypto/peerOrganizations/org2.example.com/peers/peer0.org2.example.com/tls/ca.crt" -e "CORE_PEER_MSPCONFIGPATH=/opt/gopath/src/github.com/hyperledger/fabric/peer/crypto/peerOrganizations/org2.example.com/users/[email protected]/msp" -e "CORE_PEER_ADDRESS=peer0.org2.example.com:7051" cli peer chaincode instantiate -o orderer.example.com:7050 --tls --cafile $ORDERER_CA -C $CHANNEL_TWO_NAME -c '{"Args":[]}' -n $SECOND_CHAINCODE_NAME -v $CHAINCODE_VERSION -P "OR('Org1MSP.member', 'Org2MSP.member')"With this part our entire network setup is over and we're good to test the network. If we look at the couchdb admin, it'll have the database for the corresponding channels and the chaincodes.
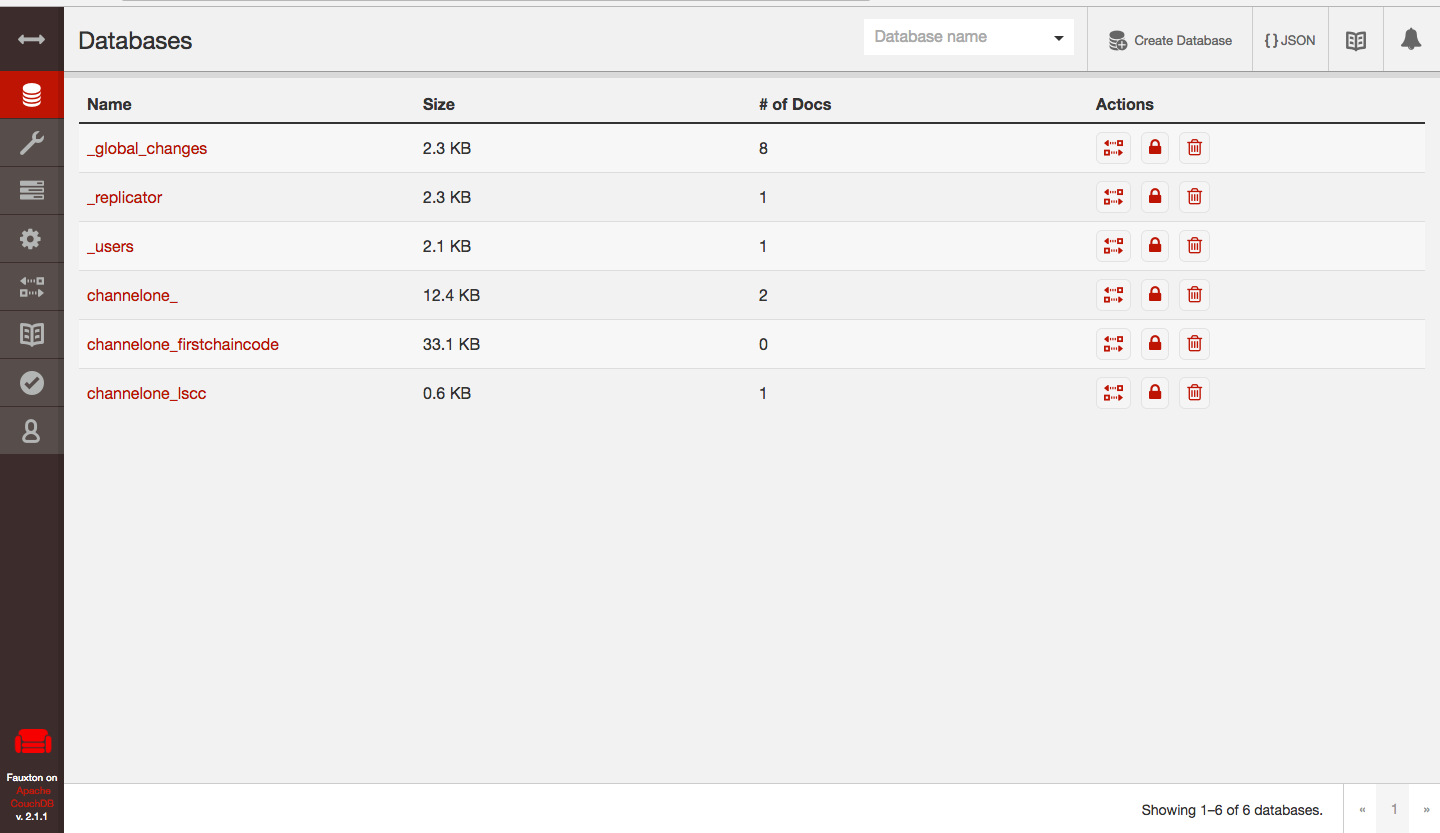
CouchDB of Org1
As we can see below it has one only one chaincode and one channel (channelone_firstchaincode)
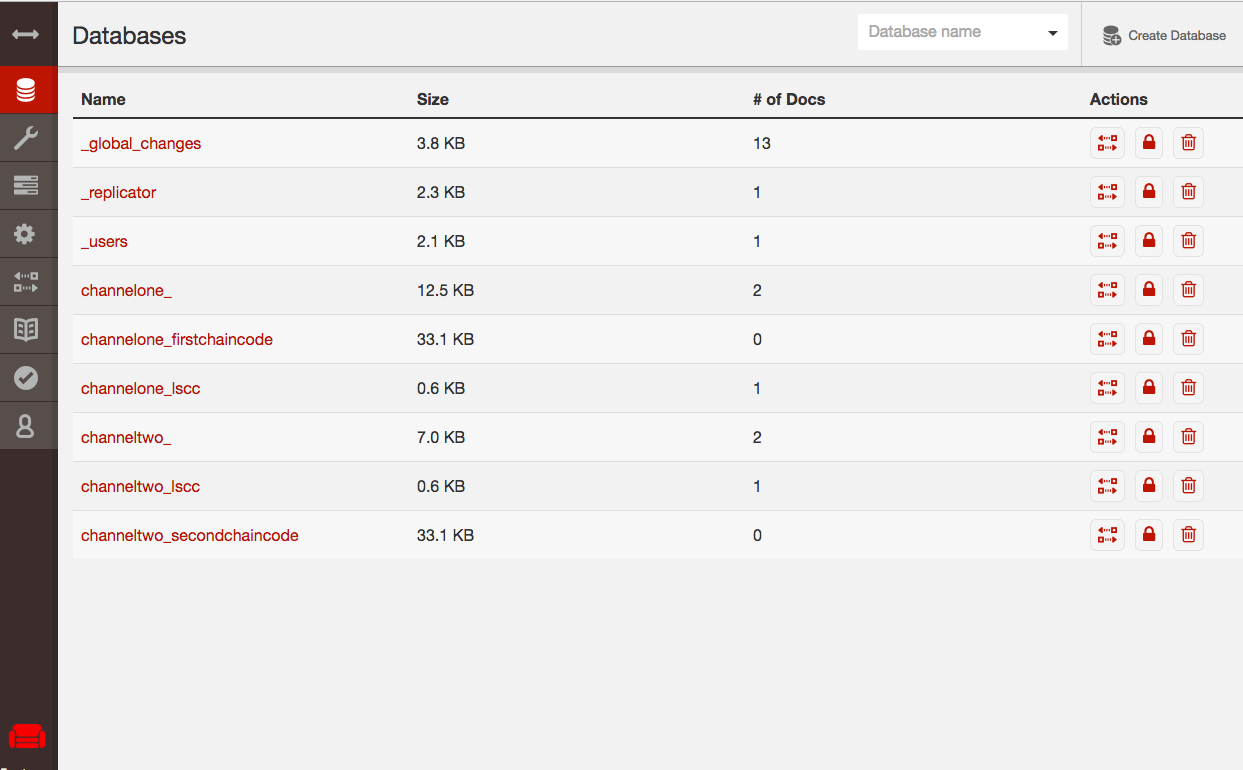
CouchDB of Org2
And the org2 has one for each chaincode and channel (channelone_firstchaincode & channeltwo_secondchaincode) Thus org2 can read and write to both the channels with corresponding chaincode.
Hope this helps you to understand how to setup an Hyperledger Fabric Network with multiple channels and multiple chaincodes. This will be really helpful when you grow your network and start thinking about separating the chaincode logic to multiple parts.